
Overview
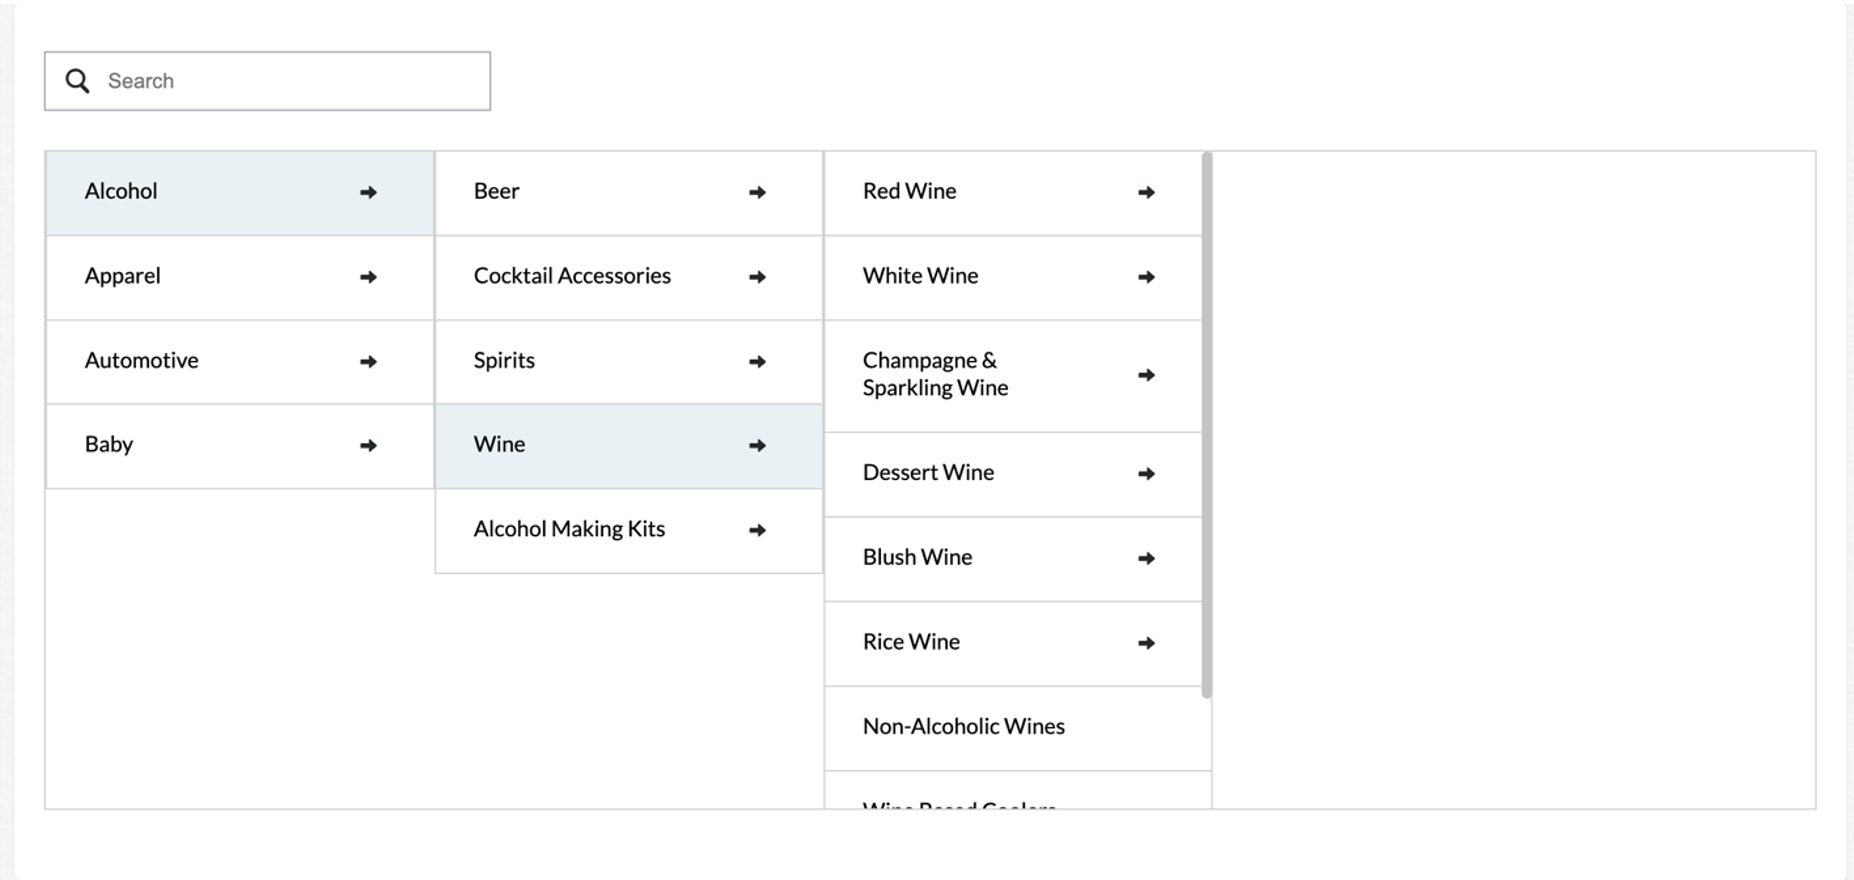
<cml:taxonomy_tool> renders a widget that allows contributors to search and browse through a hierarchical list of items (a taxonomy) and select an item (or multiple) to be submitted. Taxonomy data must be formatted according to the Taxonomy File Formats section below.
Creating a taxonomy job and using the Taxonomy Manager
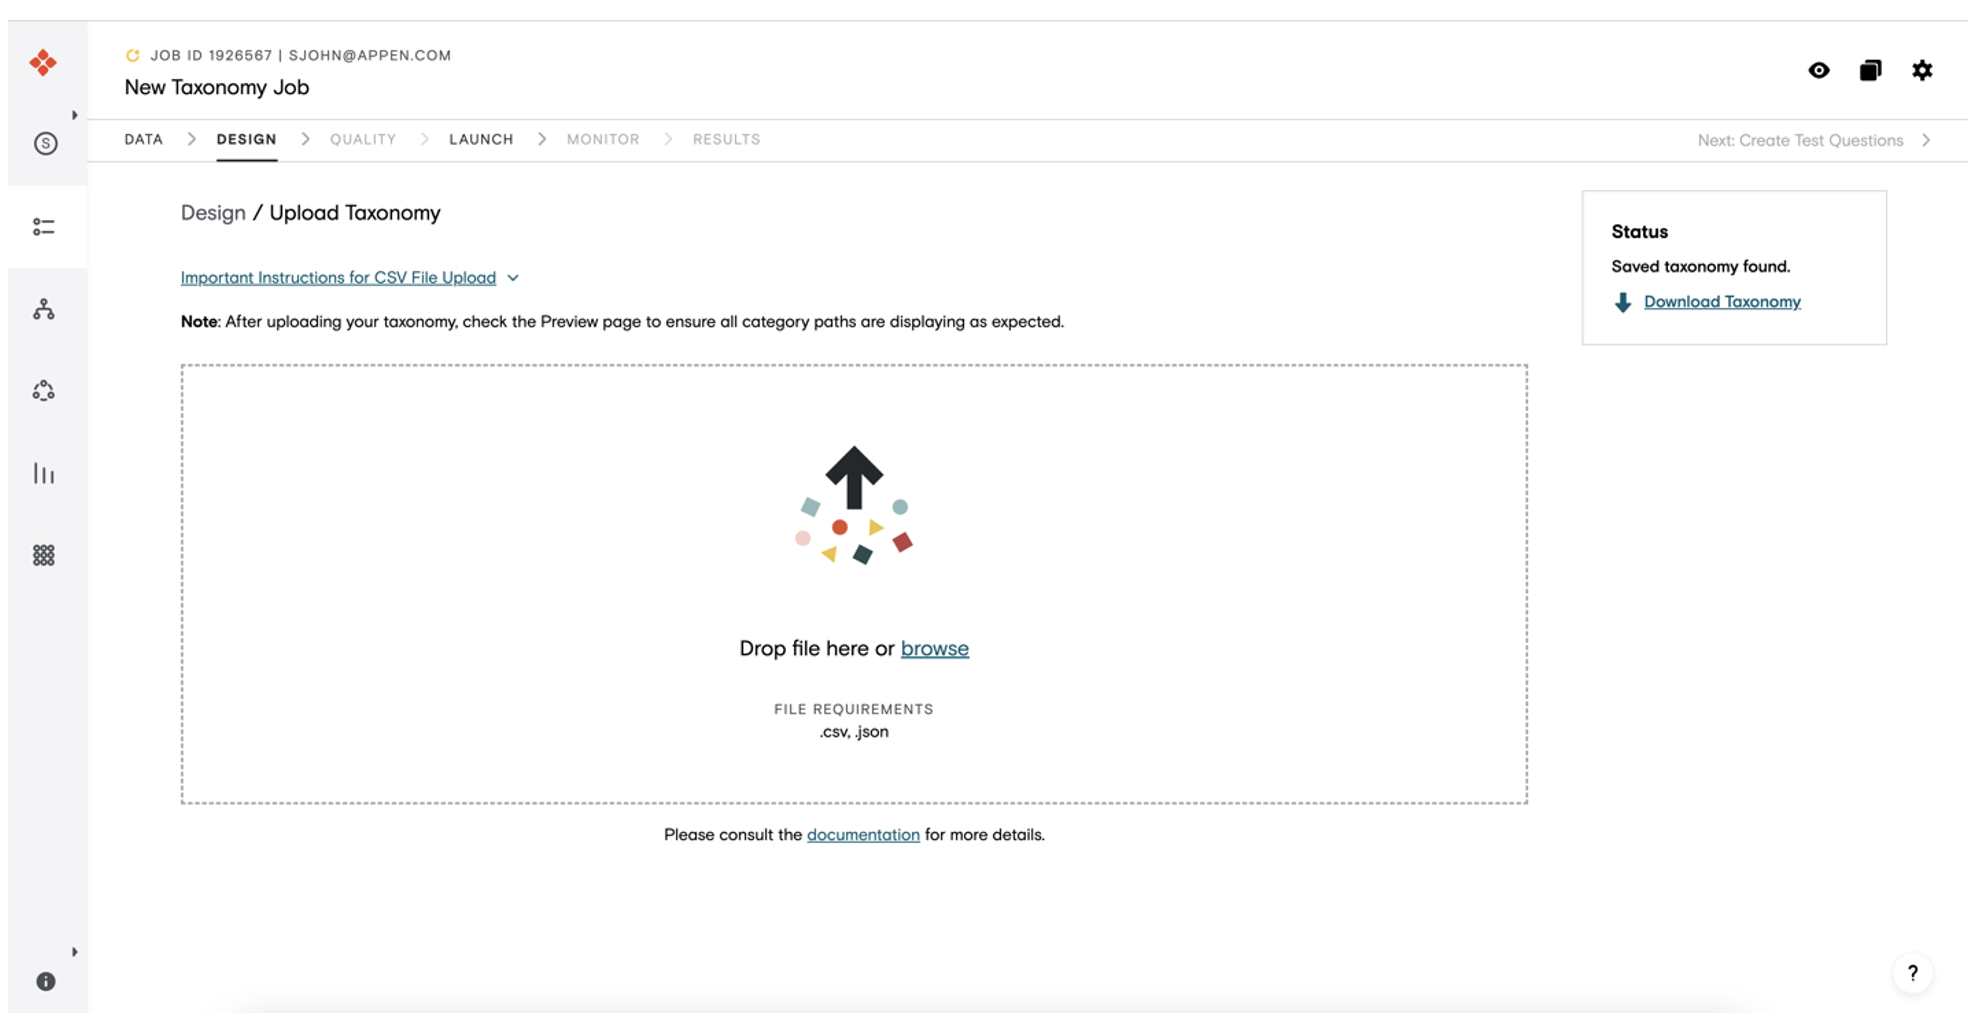
On the design page when a taxonomy job is created and the job design is saved, a selection with a link to the Taxonomy Manager link will be displayed as shown in Figure 2.
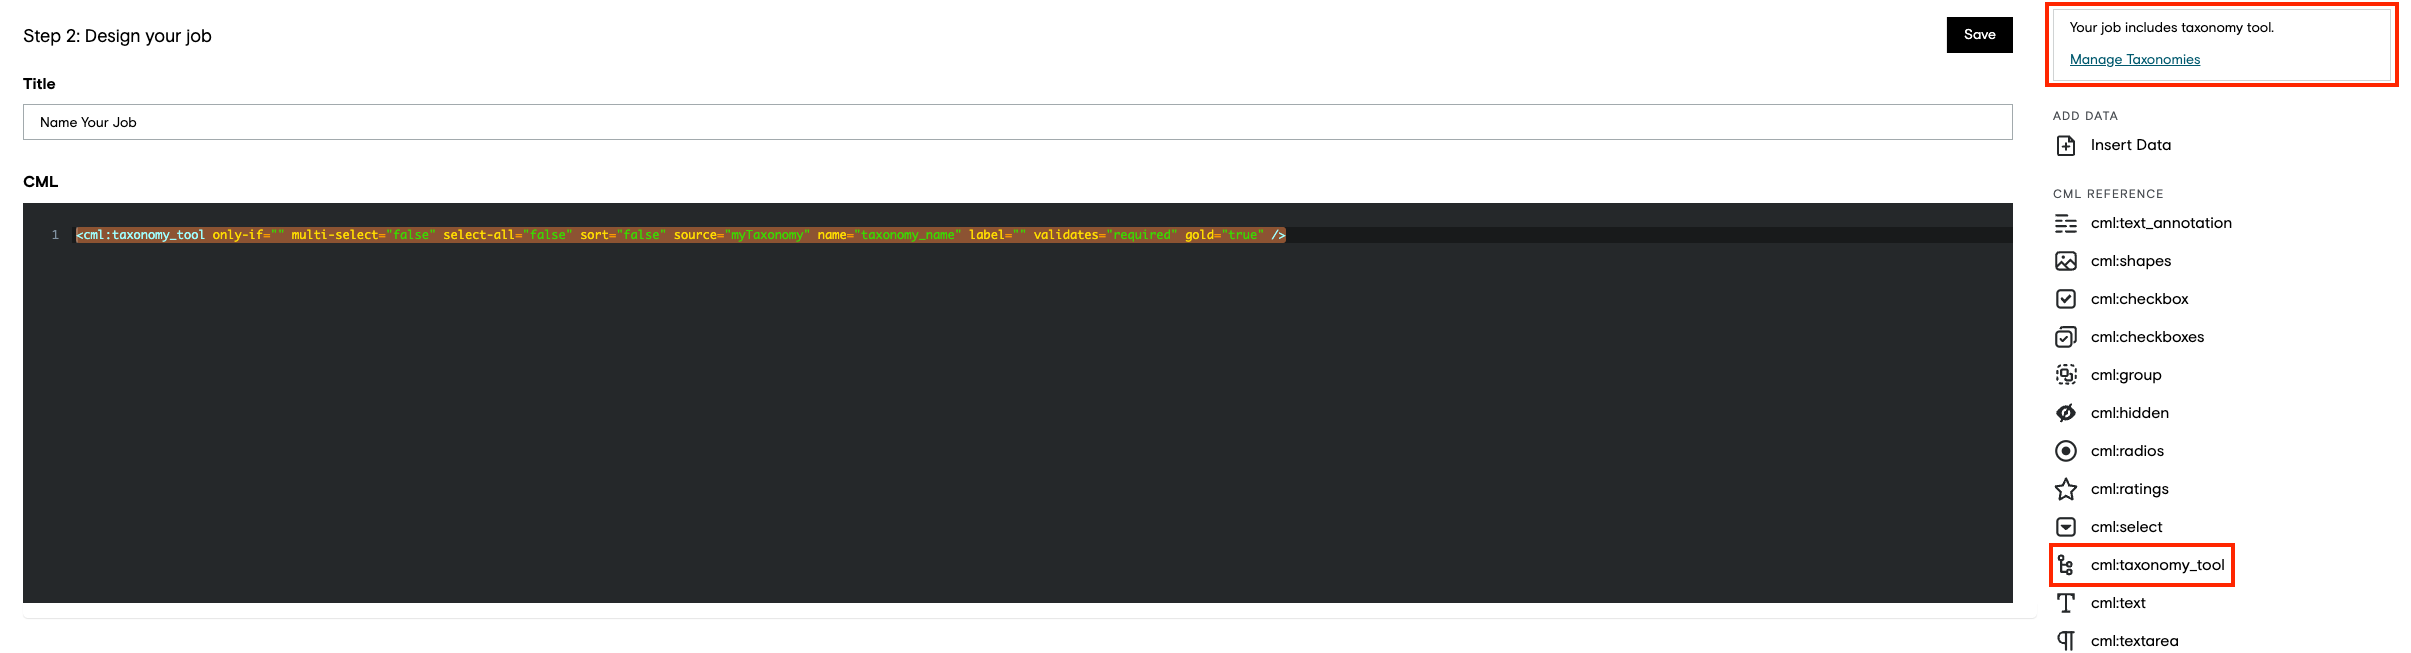
The CML tag will look something like this and can be placed directly in the CML Field:
<cml:taxonomy_tool only-if="" multi-select="false" select-all="false" sort="false" source="myTaxonomy" name="taxonomy_name" label="" validates="required" gold="true" />
On the Taxonomy Manager page, the requestor can upload the taxonomy file (json or csv). If an existing taxonomy exists on the job, then the download link will be available as shown in Figure 3.
Test Questions
You can use test questions in your jobs with cml:taxonomy_tool to ensure data and contributor quality. For units with multiple possible correct answers, the job design can be configured to support different logic for correct answers. Please refer to this article for information on supported test question matching logic.
Note: Only-If Dependency
Only-If logic in OTHER cml elements that reference the taxonomy tool is currently not supported.
Additional Attributes for item selection
multi-select
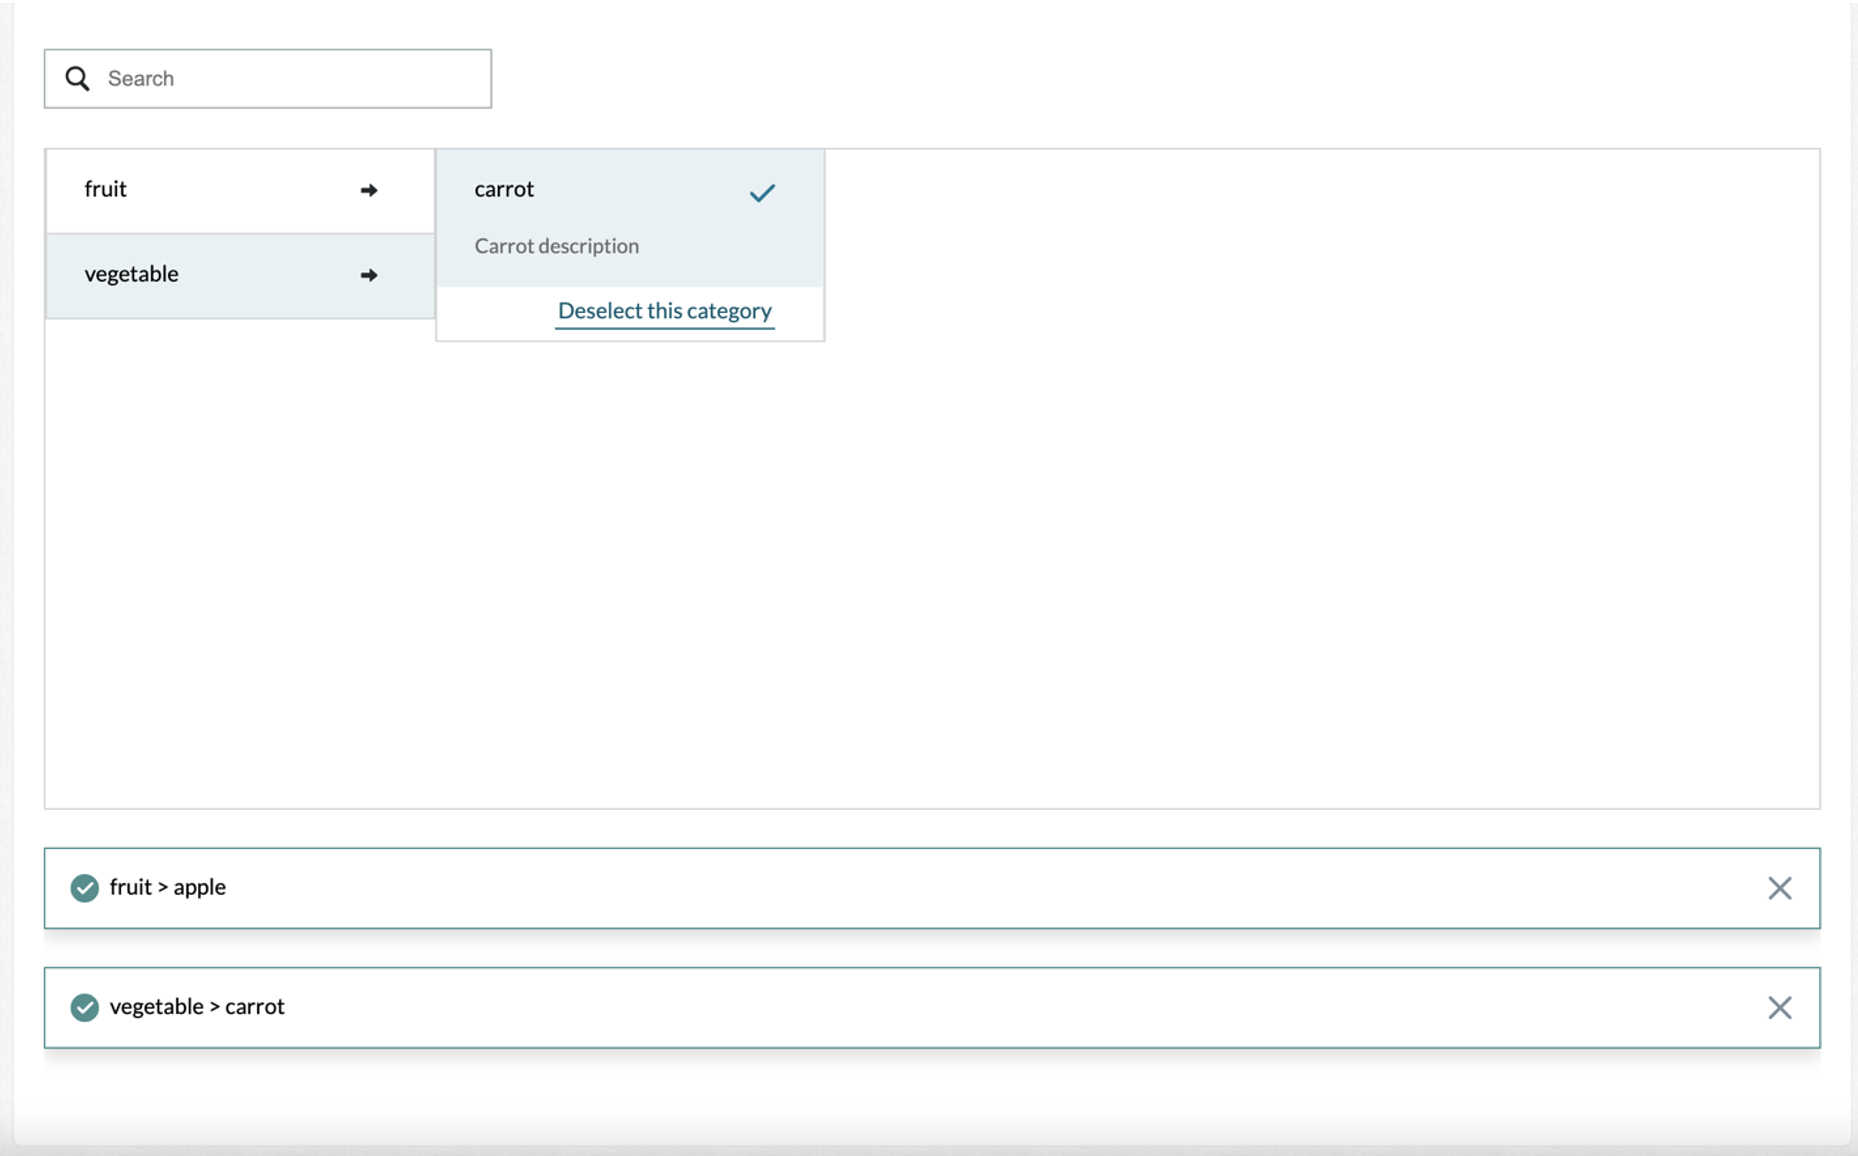
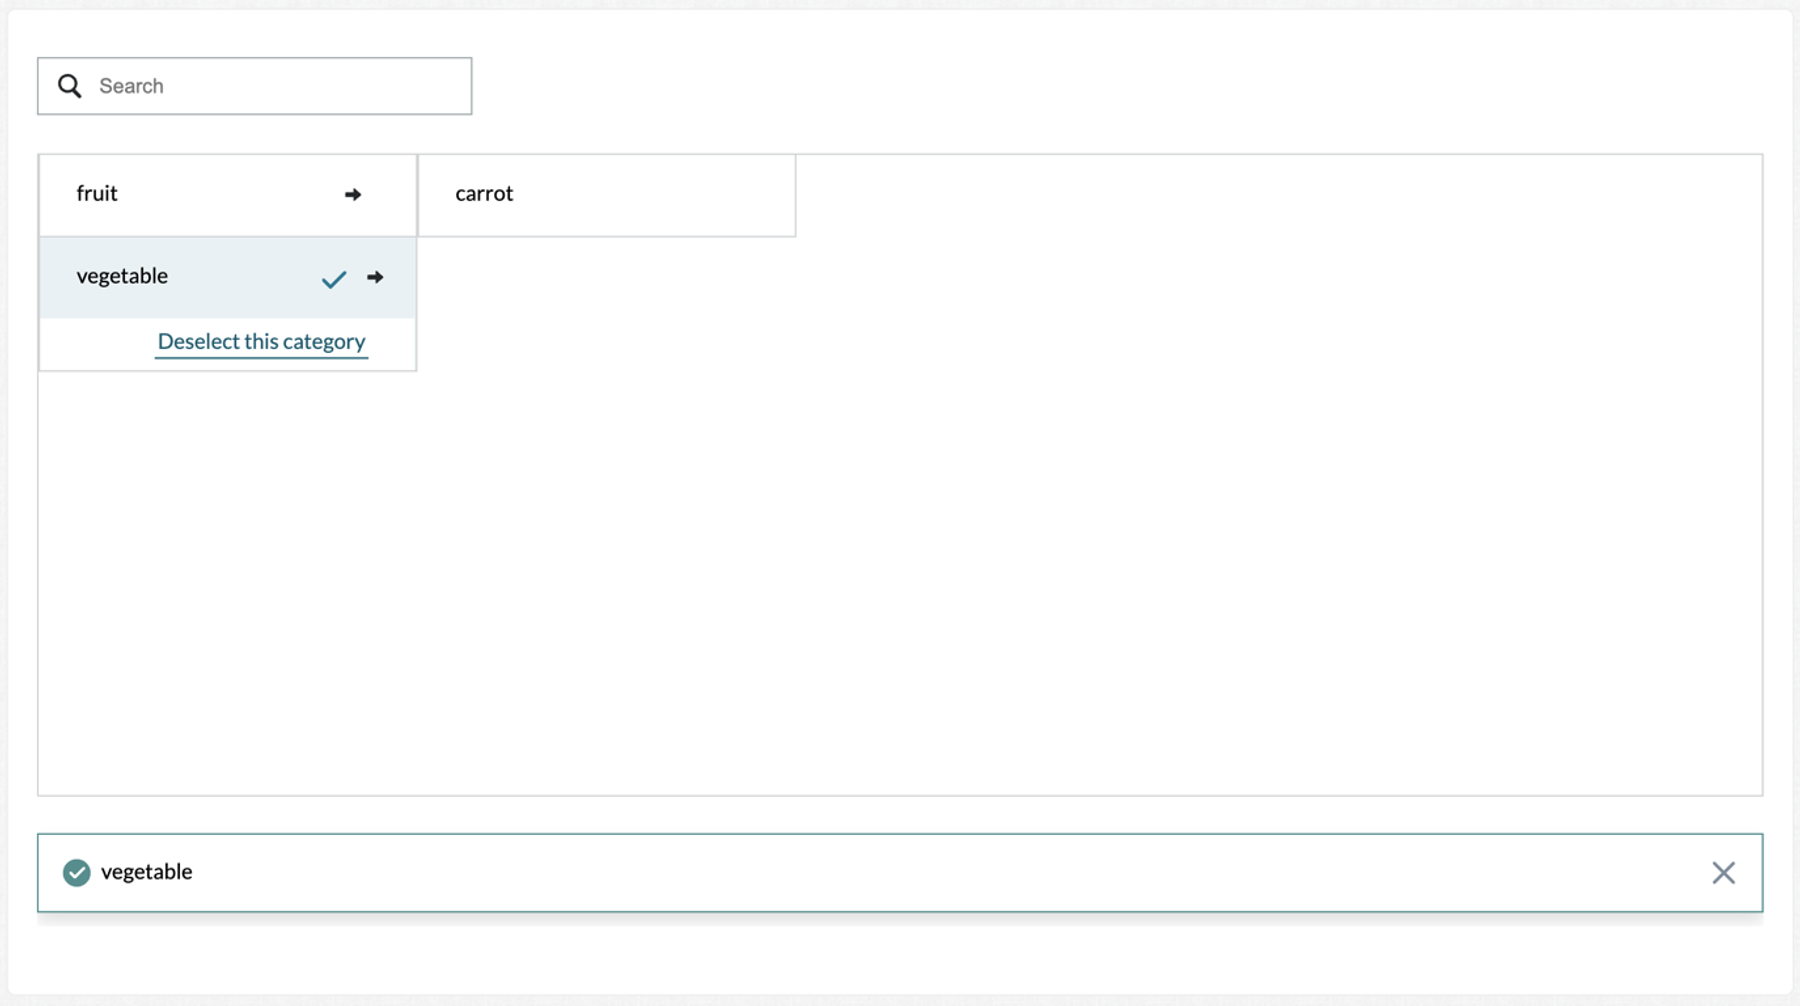
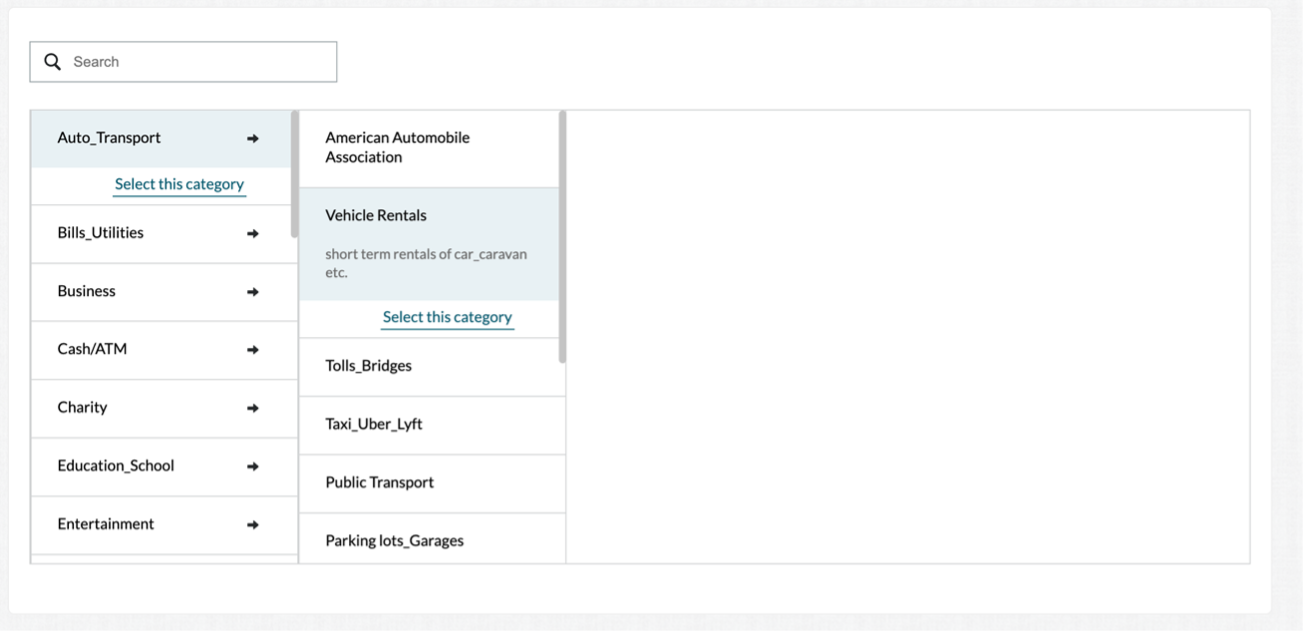
Accepts Boolean values, ‘true or ‘false’. If set to "true", the taxonomy tool will allow contributors to select multiple items. By default, a contributor can only select one item. An example of a multi-select option is shown in Figure 4.
select-all
Accepts Boolean values, ‘true or ‘false’. If set to "true", every taxonomy item will be selectable (normally only taxonomy endpoints are selectable). An example of a select-all option is shown in Figure
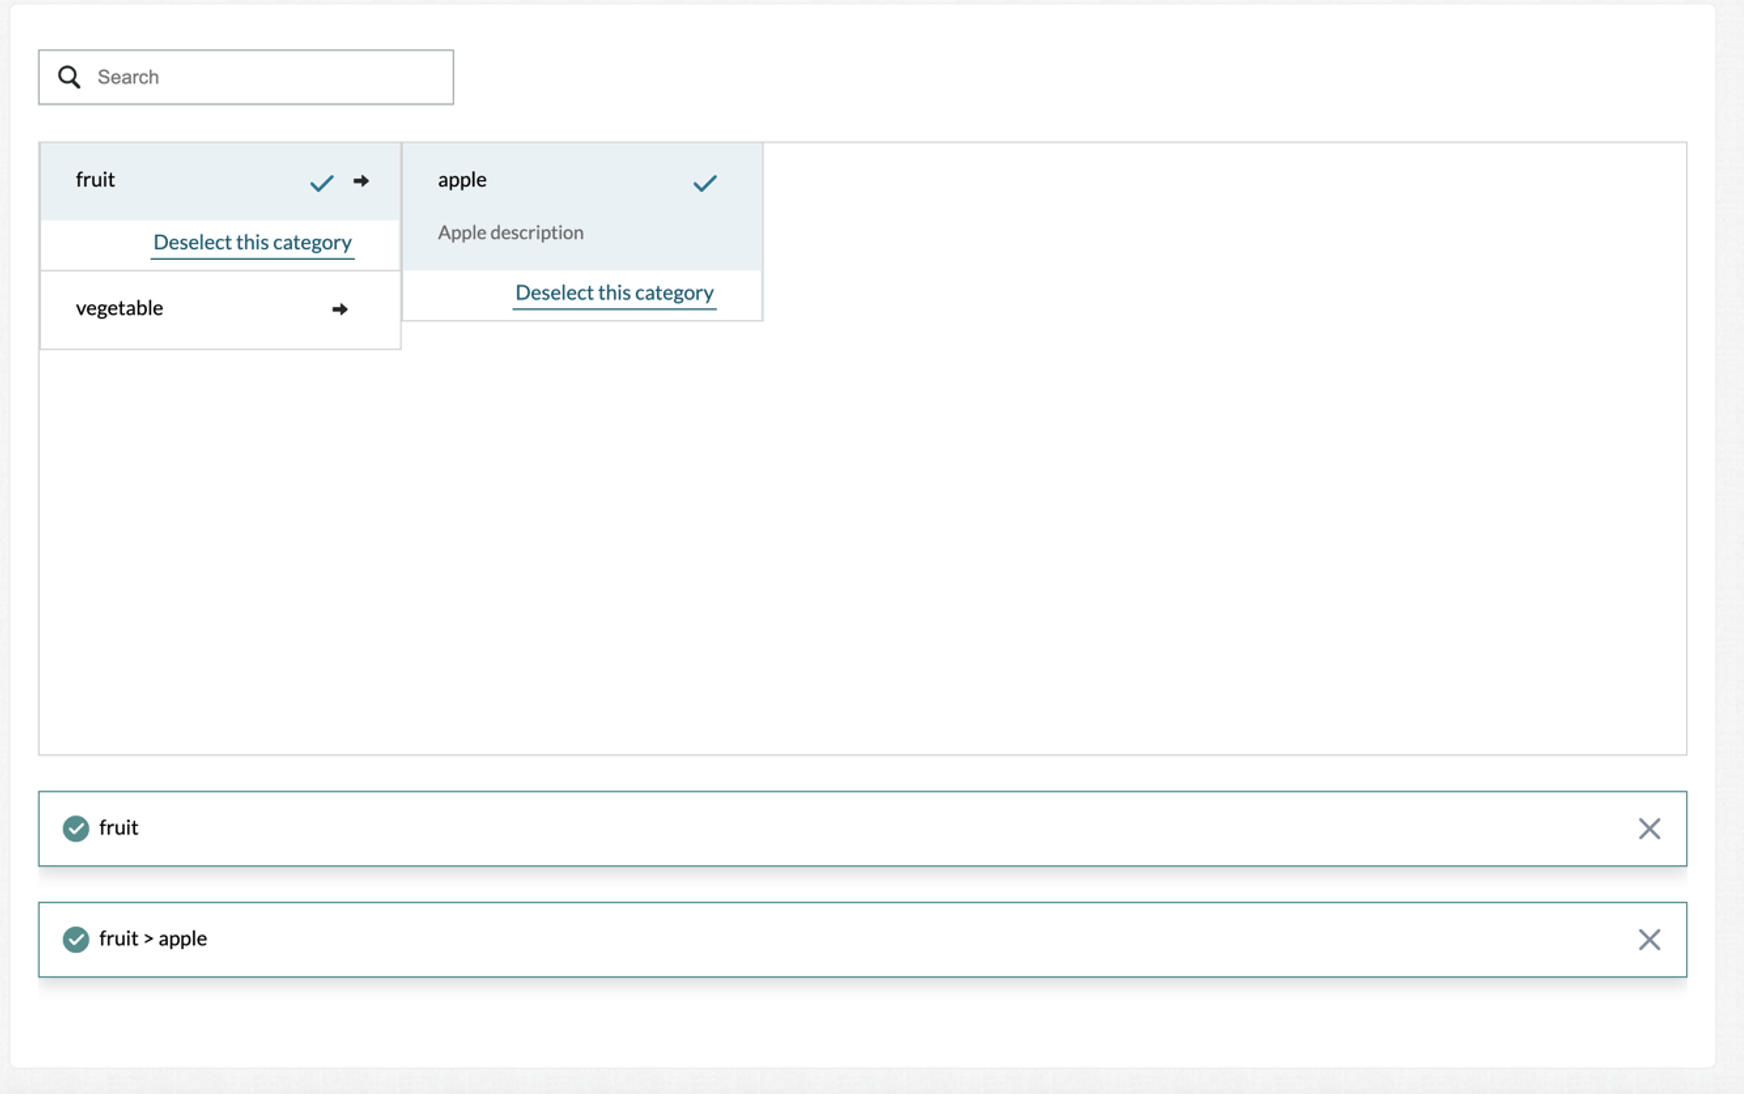
Users can set both `select-all` and `multi-select` to true to enable multiple selections of items at each level as shown in Figure 6.
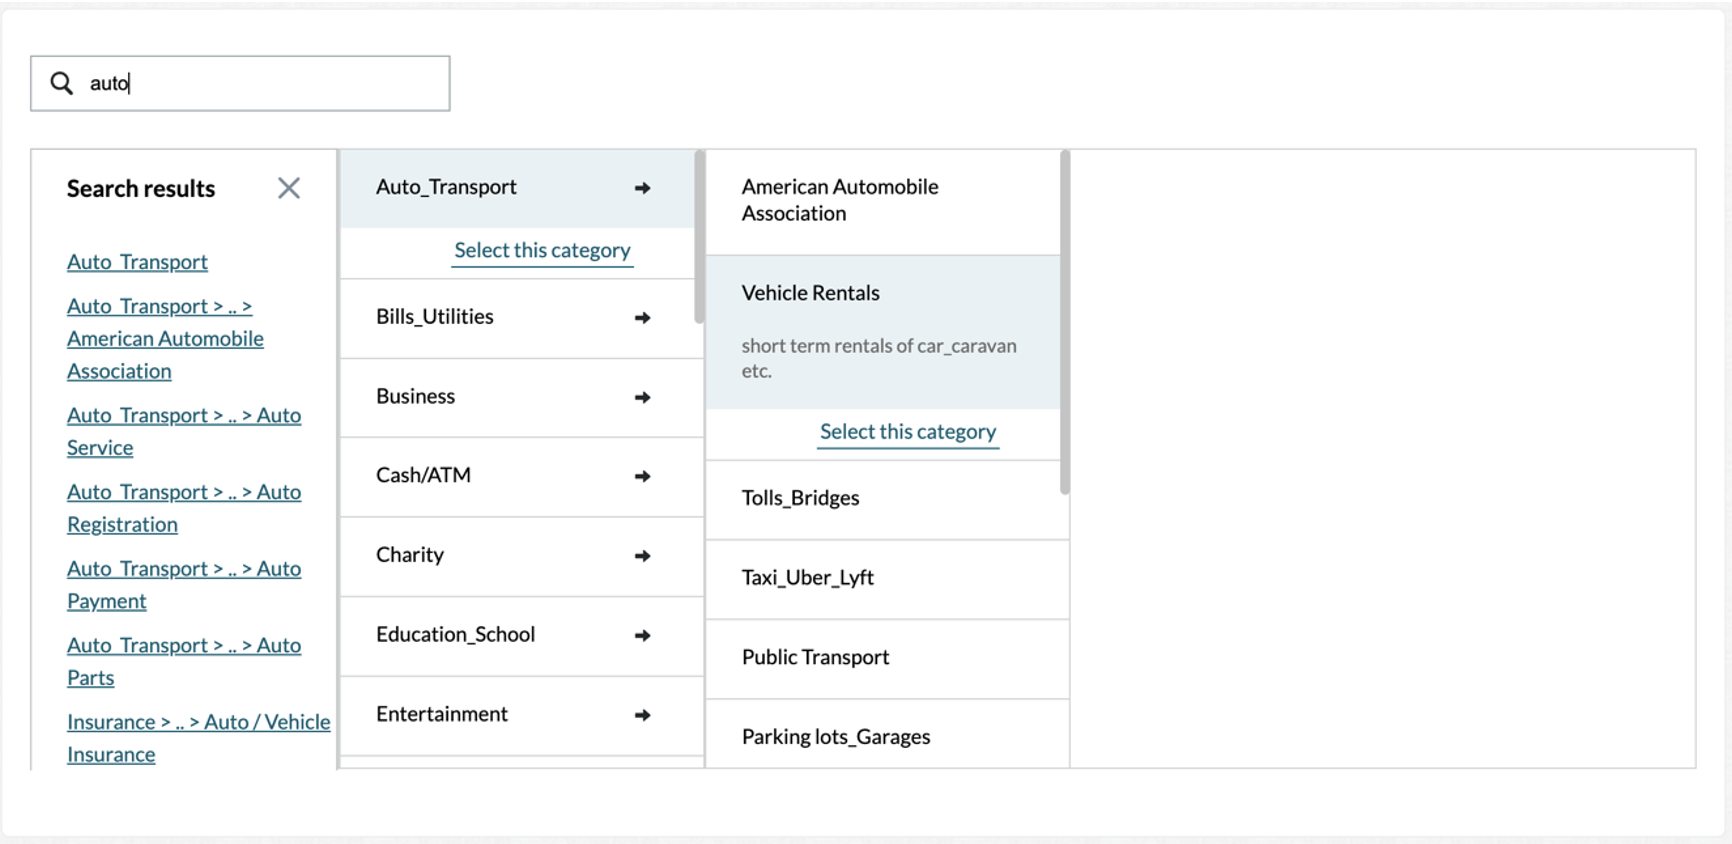
In addition to selecting items in the taxonomy, the tool also includes a search field as shown in Figure
Sorting
Nodes can be displayed alphabetically to workers by setting <sort=”true”>. If not set or set to “false”, by default they will display in the order uploaded.”
Taxonomy File Formats
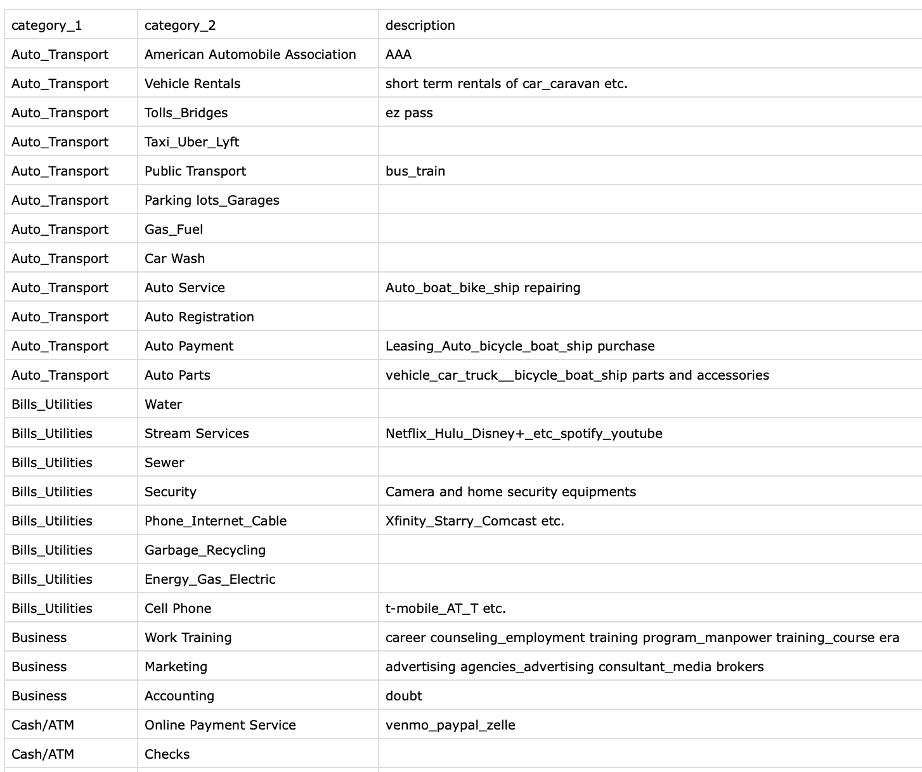
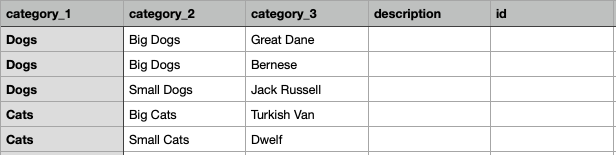
1. CSV Flat
Each row represents a category and its parent. Headers must include:
-
category_1
-
category_2
-
description (optional): any information you want displayed in the taxonomy to help the user understand what it is.
If a file is uploaded, the Taxonomy Manager will convert to JSON format that is available for downloads.
E.g., flat csv file:
Taxonomy view for the above file:
2. Nested CSV
In nested taxonomies, each row describes only a single node and the relationship with the parent and children are done spatially, so ordering matters. Headers must include:
-
category_1 through category_n: category_1 is the top-level category, followed by any number of sub-categories. Required fields.
-
id: (optional).
-
description: any information you want displayed in the taxonomy to help the user understand what it is (optional).
Example nested csv:

3. Path by Row CSV
In path-by-row csv format, each row describes a full path so there may be repeats in the parent columns. Headers must include the same as those for Nested csv format (see above).
Example: path by row csv
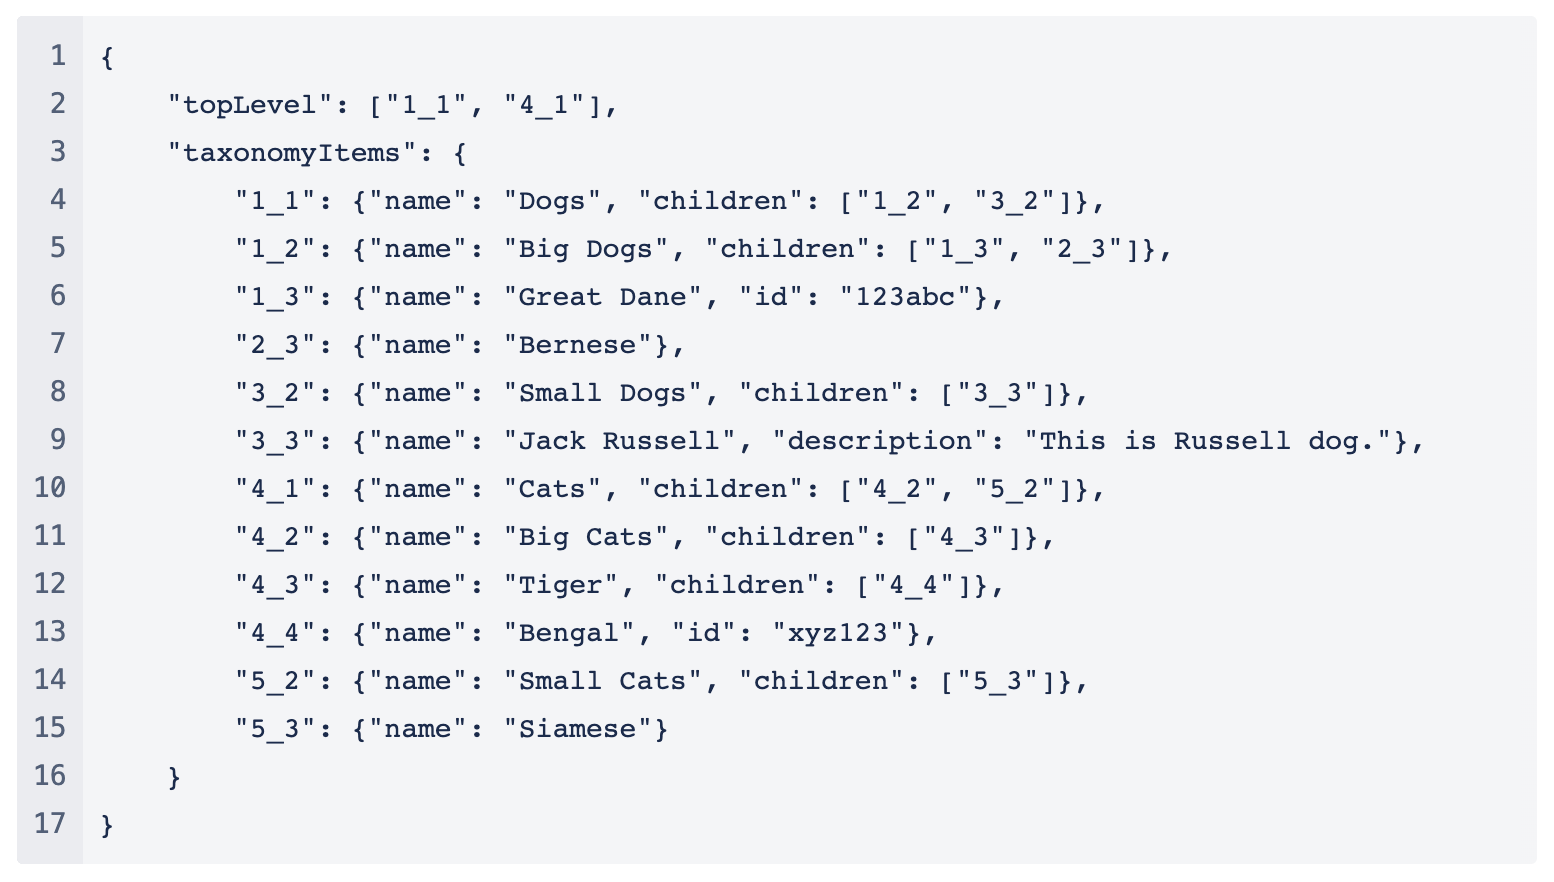
4. JSON file format
An example JSON file format:
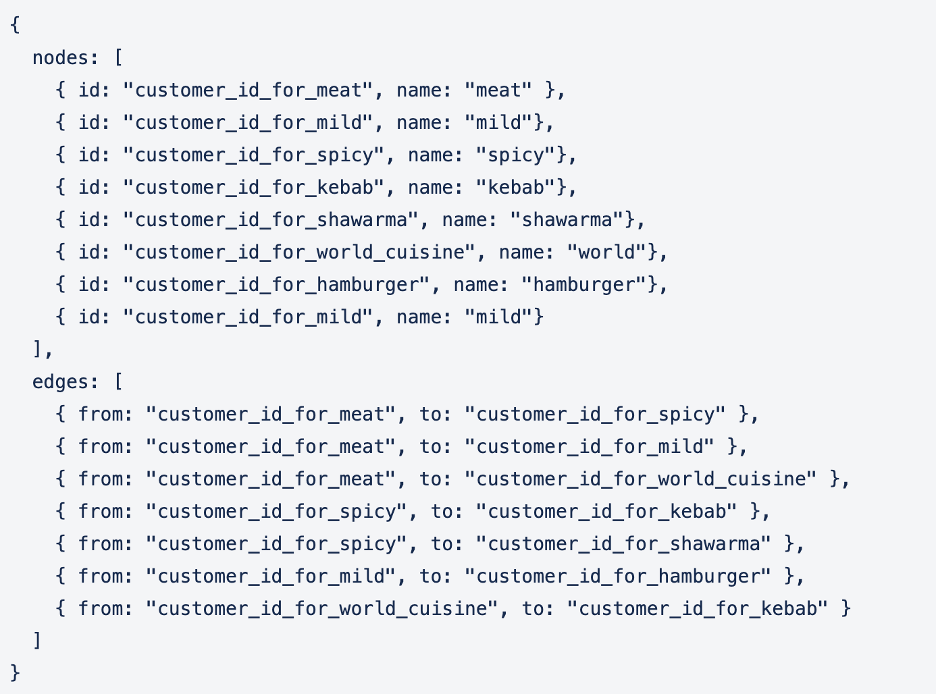
5. JSON format to support Directed Acyclic Graph (DAG)
Taxonomy Manager will also support a graph that include a DAG like the below diagram.
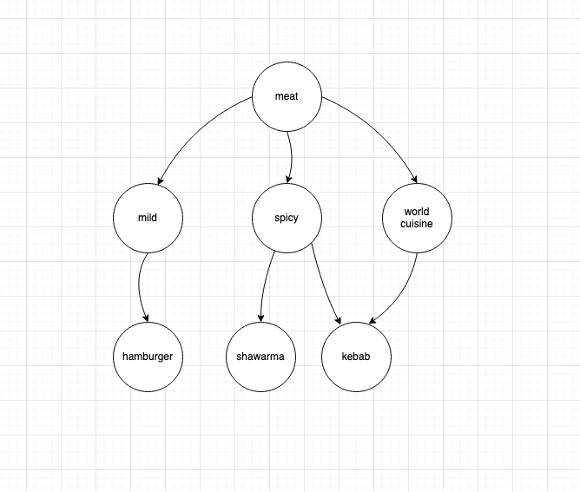
The JSON format to support the above DAG example will be:
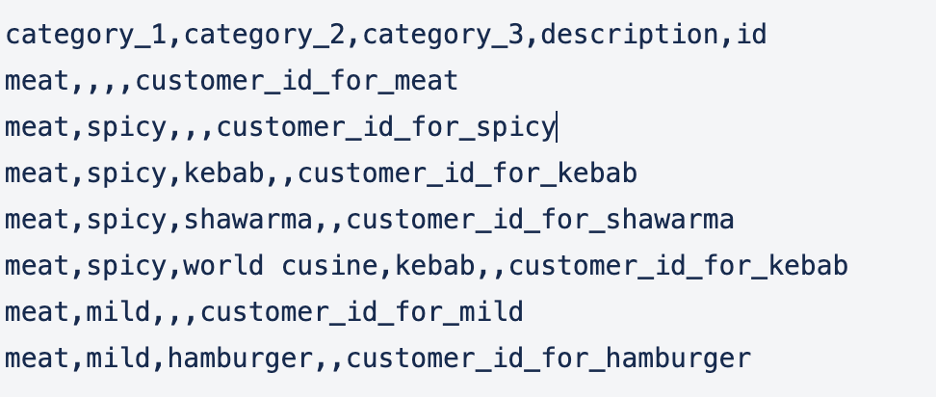
The same example can be supported in CSV using the path-by row format as shown below:
CSV file validations
In the Taxonomy Manager, before uploading a CSV file, the file must be formatted as follows to avoid bad parses:
-
CSV must have a header row. The headers must be exactly category_1,category_2,…,category_N,description, id, in that order. The description and id fields are both optional and can be present only after the first N category level header names.
-
The required delimiter for the CSV is a comma “,” Do not have spaces around this delimiting comma in your data rows, otherwise the parsed results may not be correct.
-
If a field value includes a comma, you must wrap that entire field value with double quotes, e.g.
“I have, comma”
There must be no spaces before the starting quote nor after the closing quote. The quotes must be immediately adjacent to the delimiter (,) to indicate a quoted field.
-
Each category path must be entirely on one row. Category paths with category names extended into multiple lines are not yet supported. Category paths that extend to a new line will be parsed as new category paths.
Multiple Taxonomies
You can upload multiple taxonomies to a single job, so that each row/unit can render multiple instances of taxonomy tool with different taxonomy data and/or rows requiring different taxonomies can be uploaded to the same job.
Uploading Multiple Taxonomies
UI
Via the taxonomy manager, you can upload one or more taxonomies. Taxonomies can only be uploaded one at a time. Each taxonomy should have a unique name. You can use any characters you’d like to name your taxonomies, but we recommend something easy to remember. Taxonomies can be removed from jobs as well. When you copy a job, all of its taxonomies will also be copied.
API
https://api.appen.com/v2/jobs/<JOB_ID>/taxonomy?key=<API_KEY>
You need to provide job id as part of the URL and API key as “key” get parameter. API requires next parameters:
-
file- taxonomy file(supports.csvand.jsonformats same as for UI) -
name- taxonomy name(taxonomy unique name)
Example:
curl --location --request PUT 'https://api.appen.com/v2/jobs/<JOB_ID>/taxonomy?key=<API_KEY>' \--form 'name="taxonomy-unique-name"' \--form 'file=@"/path/to/file/taxonomy.csv"'
Selecting a Taxonomy
Using the cml attribute source, you can indicate which taxonomy you want to use by its name (as created in the Taxonomy Manager), a url string starting with http:// or https://, a ref string, or using liquid reference to the unit data column if you’ve indicated the correct taxonomy in the input data.
If you’ve uploaded multiple taxonomies but have neglected to specify source, the tool will fail to initialize and you’ll be reminded to specify a taxonomy.
Note: Tool can only read the taxonomy data in internal json format. Taxonomies are only parsed when uploaded via the Taxonomy Manager or the API (Taxonomy Manager converts taxonomy in path-by-row CSV and nested graph CSV formats into the internal json format while uploading). Therefore, if you are using a liquid reference or an external url as the source, you must ensure that that source contains taxonomy in internal json format, i.e. it cannot be a url to a csv file for example.
Using One Taxonomy
You can still upload only one taxonomy if only one is required. In that case, you don’t need to indicate which taxonomy to use via source.
If you’ve already been using the cml:taxonomy_beta tool, your jobs with a single taxonomy will still work without adding the source attribute to your jobs. If you upload more than one taxonomy, you will receive an error in the tool until you add source parameter to your cml.
Removing a Taxonomy
You can remove a taxonomy via API using DELETE. Include the taxonomy name in your call.
Example:
curl --location --request DELETE ‘https://api.appen.com/v2/jobs/<JOB_ID>/taxonomy?key=<API_KEY>’ \
Uploading Taxonomies
CSVs must be formatted as follows to avoid bad parses:
-
Your CSV must have a header row. The headers must be exactly
category_1,category_2,…,category_N,description,id, in that order. The description and id fields are both optional and can be present only after the first N category level header names. -
The required delimiter for the CSV is a comma
,. Do not have spaces around this delimiting comma in your data rows, otherwise the parsed results may not be correct. -
If a field value includes a comma, you must wrap that entire field value with double quotes, e.g. “I have, comma”. There must be no spaces before the starting quote nor after the closing quote. The quotes must be immediately adjacent to the delimiter (
,) to indicate a quoted field. -
Each category path must be entirely on one row. Category paths with category names extended into multiple lines are not yet supported. Category paths that extend to a new line will be parsed as new category paths.
-
If using multiple taxonomies, specify the taxonomy you would like to use via the
sourceattribute in thecml:taxonomy_tool. The Taxonomy Title is the value that you pass to the source attribute - Ex.source="myTaxonomy"
Note: After uploading your taxonomy, check the Preview page to ensure all category paths are displaying as expected.
Test Question Matching
Note
Information in this article relates to test questions in ADAP Jobs, for information about test questions in ADAP Quality Flow, please see this page.
The default test question setting will pass a contributor as long as one of their answers matches one or more of your answers even if they've also selected a wrong answer. For example, if you select A and B as the correct answer, for a multiple checkbox question, a contributor will pass the test question if they select “A” or “B”. In this example, the contributor will be marked correct even if he/she selected a wrong answer. If you decide to be less lenient with test questions, you will want to use either of the following attributes:
exact
If set to,"true"(exact="true") the set of contributor responses must be identical to the set of pre-defined correct responses on a test question in order for that contributor's judgment to be considered correct. A contributor's response will not be considered correct if they include a response not found in the set of correct responses. For example, if responses "a", "b", and "c" are defined as correct in the test question data, then a contributor will only be correct if they submit "a", "b", and "c". Order does not matter.
Note: this setting will also attempt to match a test question even if it is left blank. For example, if you choose to not provide an answer for a set of checkboxes, the correct response with exact="true" will be none of the possible answers.
Example CML:
<cml:checkboxes label="Sample checkboxes:" validates="required" exact="true"><cml:checkbox label="Checkbox 1" checked="true" /> <cml:checkbox label="Checkbox 2" /> <cml:checkbox label="Checkbox 3" /> </cml:checkboxes>
strict
If set to "true"(strict="true"), every response submitted by a contributor must be included in the set of pre-defined correct responses on a test question in order for that contributor's judgment to be considered correct. Unlike exact, strict allows contributors to omit responses that are part of the test question set. For example, if responses "a", "b", and "c" are defined as correct in the test question data, then a contributor will be considered correct if they submit only "a" and "b".
matcher
Allows you to redefine how a contributor's responses to test questions are evaluated. Normally, a contributor's responses must exactly match that of the stored test question answers. This can be especially helpful when used with numeric or alpha test questions. This attribute can be set to the following:
-
not- This will reverse the normal behavior so that a contributor must answer anything but the pre-defined test question answer to be considered correct. For example, if answer "a" was stored in the test question data and the contributor selects answer "b" (or anything other than "a"), the contributor would get the test question correct. -
range- This allows you to specify a range that a contributor response can fall between. Specifying a minimum and maximum range will allow a greater threshold of acceptability when contributors answer test questions that may have some variances. To define the minimum and maximum, this can be set within the test question interface, or within a data file with two headers named "column_name_min" and "column_name_max". Use of a number validator is recommended in conjunction with this matcher.
fuzzy
this allows you to specify a fuzzy matching threshold for text inputs (including cml:text and cml:text_area). This options accepts a value between 0 and 1. The fuzzy matching level is computed based on the word level Levenshtein distance. If the matching level is equal or above the threshold, the response passes, otherwise it fails. For example: fuzzy="0.7".
Example CML:
<cml:checkboxes label="Sample checkboxes:" validates="required" matcher="not"> <cml:checkbox label="Checkbox 1" checked="true" /> <cml:checkbox label="Checkbox 2" /> <cml:checkbox label="Checkbox 3" /> </cml:checkboxes>
Fig. 1: Examples of how different test question matching parameters evaluate contributors