

Workflows can be used to automatically route your unlabeled data across multiple jobs in ADAP. This feature connects jobs according to routing rules that you define:
- Route all rows via linear or branched configurations
- Route rows via answer-based configuration
- Route rows randomly
- Route rows via confidence scores of a column
Workflows support the following report aggregation methods:
- Best Answer ('agg')
- All Answers ('all')
- Numeric Average ('avg')
- Top # Answers ('agg_x')
- Confidence Aggregation ('cagg_x')
- Text Annotation Aggregation ('tagg')
For more information on aggregation methods, see the article Guide to: Reports Page and Options Page
Note: For Dedicated customers, this feature is currently not available On-Premises and only available via the cloud multi-tenant Appen Data Annotation Platform.
Glossary
-
Workflow
- A data annotation process containing multiple data operators (i.e. Jobs)
-
Operator
- A step in a workflow that produces output, which can be routed to another step in the workflow.
-
Connect Canvas
- Enables users to easily connect data operators and configure routing rules.
-
Routing Rule
- Use routing rules to filter operator output for specific rows to proceed to the next step.
-
Branch
- The splitting of data across multiple operators.
-
Workflow Report
- The combined results of all operators in a workflow.
Before You Start
- Mockup and conduct a test run of the jobs you want to include in your workflow before automating them.
-
Make new copies of jobs that will be included in the workflow.
- Make sure the job that is copied from has the aggregation method set to one of the methods previously mentioned in this article. This will ensure your rows are routed properly.
- Make sure the jobs that will be included in the workflow do not have any data loaded into them. You will not be able to use a job that has data loaded, even if it has not been launched.
-
Add Test Questions
-
It is critical to include Test Questions before launching your workflow. Once you have finalized your workflow design, you can add test questions to the jobs in your workflow using any of the following techniques:
- Create Test Questions from high confidence rows. See this guide for more information.
- Copy an existing job that already contains test questions.
-
It is critical to include Test Questions before launching your workflow. Once you have finalized your workflow design, you can add test questions to the jobs in your workflow using any of the following techniques:
Creating a Workflow
1. Go to the Workflows page. From here you can view existing workflows, or create new workflows.
Figure 1. How to Create a New Workflow
2. After you have created and named your new workflow, you will be redirected to the Data tab:
- Uploading data to a workflow is similar to uploading data to a job. All data in a workflow must pass through the first operator. Data will stay at the workflow level until the workflow has been launched. Then data will flow into the first operator of the workflow.
Note: You will not be able to preview jobs with data before launching the workflow. Once data has flowed to the operator, then you will be able to preview the job with the data.
-
Dataset Requirement
- Should contain the liquid tags referenced in your operators.
- All column headers should be in lowercase, contain no special characters (!,.*&#, etc.) except for underscores used to replace and spaces.
- As with jobs, there is a 250k row limit default for workflow uploads but it can be extended to 1 million. Please contact your CSM for extending your row limit on your jobs and workflows.
Note: Unlike uploading source data directly to an individual job, the source data column headers will not be automatically validated (down-cased/replacing spaces with underscores) when uploading source data into Workflow and left as is in the source file. Please note, this difference should be accounted for when using liquid to reference columns of source data in CML to ensure data is displayed as expected.
Figure 2. Workflow Data Tab
3. After you have uploaded data to your new workflow, you can proceed to the Canvas tab to design the workflow:
-
Add your first operator to the workflow by clicking the empty tile
- Note: In workflows, jobs are synonymous with operators
-
You'll see the operator panel open which contains your jobs
-
There are some restrictions on which jobs are eligible for use in a workflow:
- You will not be able to use any jobs you do not own in your workflow
- You may only add jobs that have not yet been launched. Jobs running or already in use by other workflows will not be available.
- You may only use a job once in a single workflow.
- You may only add jobs that do not have data uploaded to them.
-
There are some restrictions on which jobs are eligible for use in a workflow:
Figure 3: Canvas Tab of Workflow
-
Configuring Routing Rules
-
After adding two operators, you will be asked to configure routing rules. You can select any of the following rules below:
- Routing All Rows - route all rows directly to the next operator. When using this option you will not be able to use branching.
-
Route by Column Headers - route rows based on column filter.
- First, select a column header you want to use to filter on
-
Second, select a filter type:
- Equals
- Does not equal
- Contains
- Is greater than
- Is greater than or equal to
- Is less than
- Is less than or equal to
- Third, enter the answer value of the question set in the column header
- Note: This should exactly match the 'value' specified in your CML and is case sensitive.
- Route a Random Sample - Automatically send "n%" randomly selected rows from one operator to the next based on your desired sample size to streamline and automate various QA processes.
-
Route by Column Confidence - Route the column header of interest by the desired confidence threshold to allow the workflow to automate the qualifying of rows.
- This routing option supports any column using 'agg' aggregation.
-
If desired, add multiple conditions to the rule to fine-tune how rules are handled.
- Note: you cannot add both 'AND' and 'OR' conditions to the same rule at the same time
-
After adding two operators, you will be asked to configure routing rules. You can select any of the following rules below:
Figure 4. Configuring Routing Rules Between Jobs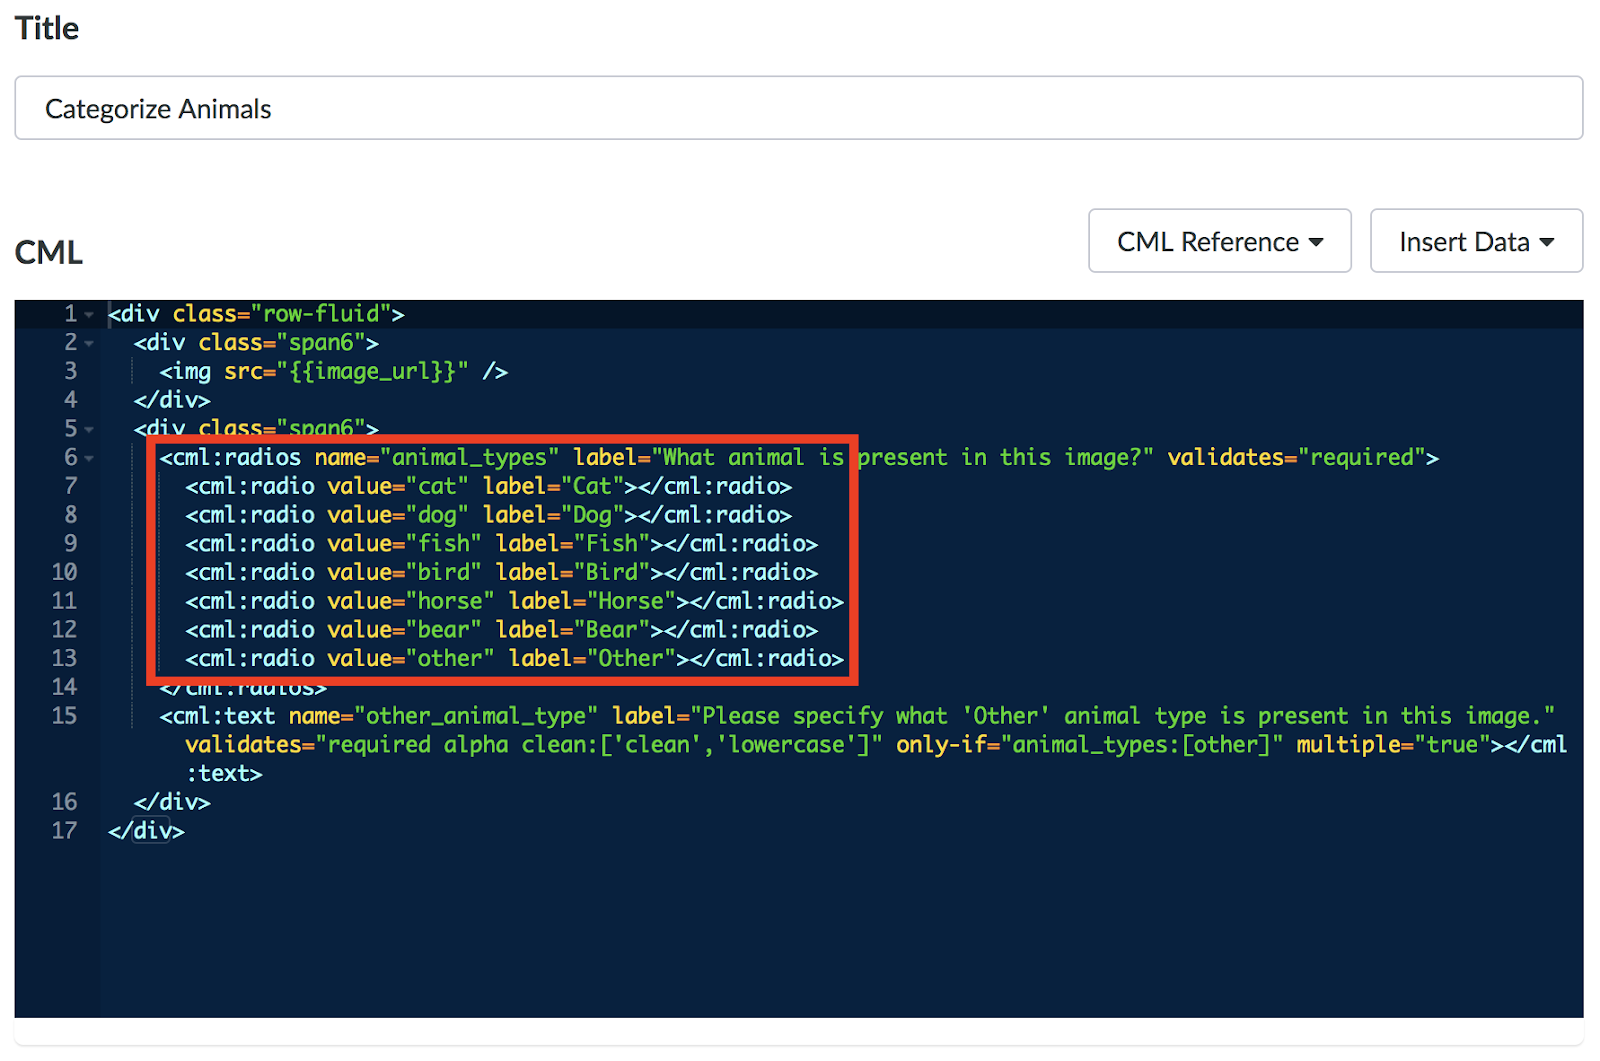
Figure 5. Example CML With 'values' To Be Used In The Routing Rules
-
-
Setting up branching operators
- Create workflow branches to route the output of one operator to several destination operators
-
Branching becomes available once you add a second-level operator to our workflow.
- Note: Currently, we do not support the merging of output of branches back together into one operator.
-
Setting up branching operators
Figure 6. Workflow Structure With Branching
4. After you have configured your routing rules, you can proceed to the Launch Tab:
-
On the launch page, we will display a summary of the operators in your workflow and highlight a few important items:
- Price per Judgment and Judgment per Row for each operator
-
Estimated Maximum Cost
- This is intended to provide max contributor cost estimate if all uploaded rows run through all operators
- Available Funds
5. Launch the workflow
-
As with jobs, we recommend testing your workflow with 100 rows before ordering a large number of rows. To do this, select "Order rows and Launch".
- Note: The order of operators (ex. jobs, scripts, or models) and routing rules cannot be edited after a workflow is launched. It remains static once the workflow is launched.
6. Workflow Reports
- After the initial test run, you'll want to review your workflow report which contains data from all operators based on your filtering rules. Please review your test run to ensure all rows routed correctly before launching the remaining rows in the workflow.
-
The workflow report will contain some new columns not found in the job report:
-
data_line_id- This identifier will follow the row from the first operator to be finalized workflow report. It is a lot like unit_id and can be used to track results and where a row was routed.
-
row_ingested_at- This is the timestamp at which the row was uploaded to the workflow.
-
j{job_id}:{column_header}:agg- For every operator in your workflow, you will see a column containing the Job ID and the question being answered. This column will contain the value of the aggregated answer chosen in the operator
-
j{job_id}:{column_header}:confidence- This will be the confidence of the aggregated answer.
-
-
For jobs that leverage our annotation tools, you will also see the following columns:
-
j{job_id}:{annotation}- This will contain the aggregated annotation for the row or the CDS ref for the row
-
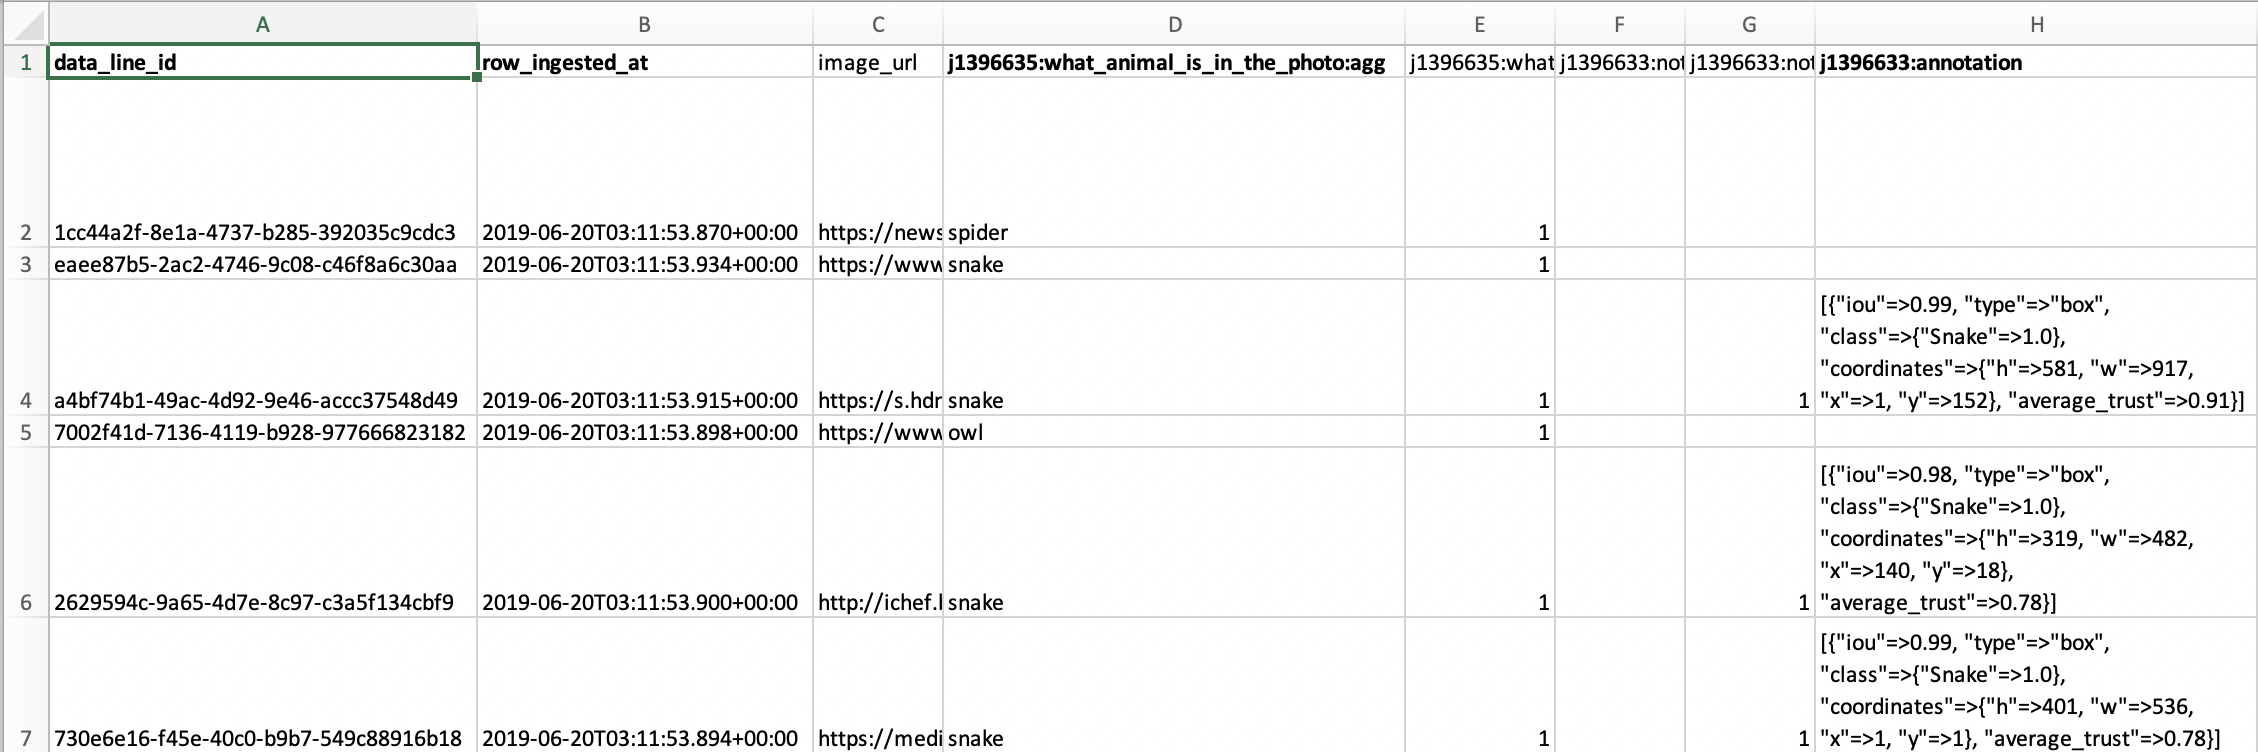
Fig 7. Example Workflow Report
Supported CML Elements
Workflows support the following cml:elements
-
Supports routing by all routing rules (for Confidence Routing must be set to 'agg'):
cml:checkboxcml:checkboxescml:radioscml:radiocml:ratingscml:selectcml:textcml:textarea
-
Supports routing by All Rows and a Random Sample only (does not support Confidence Routing):
cml:audio_annotationcml:audio_transcriptioncml:image_segmentationcml:image_transcriptioncml:shapescml:taxonomy_toolcml:text_annotationcml:video_shapes
Common Troubleshooting Steps in Workflows
-
Data failing to route to the next operator in the workflow.
- Ensure that all referenced data sources in your CML exist in either the workflow source report or are created as an output in the operator it is receiving data from
- If using conditional routing, ensure the aggregate results satisfy at least one of the conditions
-
Issues with initializing data or viewing data
- Check that
review-from='{{sourceData}}'andtask-type='qa'are correctly referenced in the CML -
If using SDA ensure that you are using the secure filter in your CML
{{sourceData | secure: 'storageCmlName'}}
- If using an ADAP annotation tool, check the previous job's aggregate report to ensure that it contains the 'url' key in the annotation output
- Check that
-
Data has flowed to the operator but hasn't automatically launched
- First check the launch page to ensure there are rows available to launch. Attempt launching manually.
- If the problem persists, reach out to your CSM or Platform Support for help in resolving the issue
-
Uploaded data to the Workflow, but the Workflow is not showing the data as available on the launch page
- Delete the uploaded data and upload it again
- If the issue persists, copy the workflow and start anew
This product is in BETA. In order to activate Workflows for your Team reach out to your CSM and for Workflow technical support reach out to the Appen Platform Support team.