

The cml:shapes tag allows users to create an image annotation job for bounding boxes in conjunction with a custom ontology and the use of test questions and aggregation.
Building a Job
The following CML contains the possible parameters for a bounding box with labels job:
<cml:shapes type="['box']" source-data ="{{image_url}}" name="annotation" label="Annotate this image" validates="required" ontology="true" box-threshold="0.7" box-agg="0.6" class-threshold="0.7" class-agg="agg" min-box-height="5" max-box-height="35" min-box-width="5" max-box-width="5" allow-box-rotation="true" crosshair="true" output-format="url" allow-image-rotation="true"/>
Note: There are parameters for test questions and aggregation that apply to both the bounding boxes and the labels.
Parameters
Below are the parameters available for the cml:shapes tag. Some are required in the element, some can be left out.
-
type- The shape used in the job, set in an array.
-
To use multiple shapes in one job, include each shape in the array, separated by commas, e.g.,
type="['box','dot','polygon','line']"- You’ll need to include the corresponding parameters for each shape
-
source-data- The column from your source data that contains the image URLs to be annotated.
-
disable_image_boundaries: allows shapes to be drawn outside the image boundary-
when
disable_image_boundaries="true"shapes can be dragged outside the image boundaries and the output will contain negative values -
the default setting for
disable_image_boundariesis "false"
-
when
-
name- The results header where annotations will be stored.
-
label- The question label contributors will see.
-
validates(optional)- Whether or not this element is required to be answered.
- Accepts ‘required’
- Defaults to not required if not present
-
ontology(optional)- The list of classes to be labeled in an image - view this article to learn how to create your custom ontology.
- Accepts 'true' or 'false'
- Defaults to ‘false’ if not present
-
review-data(optional)-
This will read in existing annotations on an image. The format must match the output shown in the aggregation section below. All that’s needed is the following:
- ‘type’
- ‘class’ if using an ontology
- ‘coordinates'
- 'id'
- Example:
[{“class”:“car”,“coordinates”:{“h”:330,“w”:384,“x”:1191,“y”:306},“type”:“box”,“id”:“247f2099-22e1-4825-9bc1-3e51c6019fe0”}]
-
This will read in existing annotations on an image. The format must match the output shown in the aggregation section below. All that’s needed is the following:
-
box-threshold- The minimum overall bounding box IoU required for a contributor to pass a test question.
- Accepts a decimal value between 0.1 and 0.99.
-
class-threshold- Example: the class-threshold is set to 0.7 and a test question contains 10 ground truth shapes. A contributor gets 8 out of 10 classes correct for a score of 80% and they’re marked correct on the test question.
- The minimum percentage of correct classes applied to boxes in a test question for a contributor to be considered correct.
- Accepts a decimal value between 0.1 and 0.99.
- The formula is correct / (correct + incorrect)
-
box-agg- The minimum IoU required for result boxes to be clustered together.
- Accepts a decimal between 0.1 and 0.99, or the value ‘all’.
- If ‘all’ is selected, no clustering is done on the boxes.
-
class-agg- The aggregation applied to the class for a given cluster of shapes.
-
Accepts standard aggregation types:
aggallagg_xcagg_x
-
min-box-height(optional)- Each box drawn by a contributor must be at least this height in pixels
- Accepts a positive integer - must be at least 2
-
max-box-height(optional)- The maximum possible height in pixels each box can be
- Accepts a positive integer - must be at least 2
- Please note: If using the Graphical Editor, moving the slider all the way to 1000+ does not set a maximum height. To set the maximum larger than 1000px, you will need to set the max-box-height in the Code Editor.
-
min-box-width(optional)- Each box drawn by a contributor must be at least this width in pixels
- Accepts a positive integer - must be at least 2
-
max-box-width(optional)- The maximum possible width in pixels each box can be
-
Accepts a positive integer - must be at least 2
- Please note: If using the Graphical Editor, moving the slider all the way to 1000+ does not set a maximum width. To set the maximum larger than 1000px, you will need to set the max-box-width in the Code Editor.
-
allow-box-rotation(optional)- Will enable bounding boxes to be rotatable
- Accepts 'true' or 'false'
- Defaults to ‘false’ if not present
-
crosshair(optional)- Will enable crosshair location indication
- Accepts 'true' or 'false'
- Defaults to ‘false’ if not present
-
box-aspect-ratio(optional)- Will enable crosshair location indication
- Controls the aspect ratio of the box
- The ratio is width:height
- Setting this to 1:1 enforces a square
- Accepts ratio of integers, e.g., 2:1
-
output-format(optional)- Accepts 'json' or 'url'
-
If ‘json’, the report column containing contributors' annotation data contains the annotation data in stringified JSON format. The JSON format is as follows (this is the legacy JSON format):
-
[
  {
    "id": "4bc1ba1d-ede9-4b80-9892-95fced615441",
    "class": "Car",
    "type": "box",
    "coordinates": {
      "x": 416,
      "y": 243,
      "w": 125,
      "h": 95
    }
  }
]
-
-
If ‘url’, the report column containing contributors' annotation data contains links to files. Each file contains annotation data for a single data row in JSON format. With this new output option, we have updated the JSON structure to allow inclusion of more data fields. The new JSON format is as follows:
-
{
  ableToAnnotate: true,
  imageRotation: 30,
  annotation: [{
    "id": "4bc1ba1d-ede9-4b80-9892-95fced615441",
    "class": "Car",
    "type": "box",
    "coordinates": {
      "x": 416,
      "y": 243,
      "w": 125,
      "h": 95
    }
  }]
}
-
- In the case where the tool was unable to load the input data and the contributor was unable to annotate,
ableToAnnotatewill be set tofalse. - Defaults to ‘json’ if attribute not present.
-
This parameter is available within the CML only; it is not yet supported in the Graphical Editor.
-
allow-image-rotation(optional)- Accepts
trueorfalse -
If
true, contributors can rotate the image within the image annotation tool. Contributors click a toolbar icon to turn on a rotation slider that can be used to adjust rotation angle from 0 to 359 degrees. The degrees rotated are exported in theimageRotationfield. This feature is only compatible with export optionoutput-format=url; this attribute must be added to the job cml before launch.- Important note: Test questions and aggregation are not currently available for this annotation mode.
-
If
false, contributors cannot rotate the image. -
Defaults to
falseif attribute not present.
- Accepts
-
task-type(optional)- Please set task-type=”qa” when designing a review or QA job. This parameter needs to be used in conjunction with review-data . See this article for more details.
Ontology Configuration
The shapes tool supports ontologies. In addition, validators can be configured for each class in order to limit the number of shape instances contributors can create in that class.
Fig. 1 Ontology Manager Configuration
Customizable Hotkeys
- Hotkeys can be assigned to classes by the user. Hotkeys cannot conflict with any other browser or tool shortcuts.
Fig. 2 Hotkeys Configured in Ontology Manager
Ontology Attributes
-
Our ontology attributes feature allows users to collect additional metadata on shape objects. Visit this link to learn more about ontology attributes: Guide To: Running a Job with Ontology Attributes.
Fig. 3 Ontology Attributes Configured in Ontology Manager
Creating test questions
When using the cml:shapes tag, the behavior of test questions and aggregation will change based on the shapes chosen and whether or not the job includes an ontology.
- On the quality page, click “Create Test Questions”
- Add annotations around the objects in the way specified in the job's instructions
- If no annotations are needed, make sure the job includes an option, such as a single checkbox, to hide the annotation tool
- Save Test Question
Fig. 4 GUI View Shapes Tool
Reviewing test questions
- Select a test question from the quality page.
-
From the image annotation sidebar, click ‘Find a Judgment’ and choose a contributor ID from the drop-down.
- The overall contributor IOU will show in the left panel for that test question. This displays the average of all valid box IOUs and unmatched box IOUs (i.e. including both missed contributor and correctly matched gold boxes). If a contributor single box's IOU with a gold box is below the set threshold, the platform calculates the box as an automatic fail and treats it as 0% IOU to contribute to the overall IOU.
-
Example: Say there is a job with a box threshold of .7 and one test question has two objects to box. If one object has an IOU of 75% and the other box has an IOU of 45%, the overall IOU would be as follows:
- (.75 + 0 (from the missed contributor box since it is below the 70% threshold) + 0 (from the missed gold box) / 3 (the total number of missed/drawn boxes)) = 0.25.
-
Edit, create or remove the test question annotations based on feedback. Judgments are color-coded based on if they match the gold responses.
- Each shape will have its own matching metrics, which can be seen by hovering over a contributor judgment or golden shape. A notification will appear in the top left corner of the image. A score from zero to one is displayed based on the intersection over union formula. If using an ontology, the class match is also displayed.
- All scores on the image are averaged and compared to the test question threshold set in the job design. The overall matching score is then displayed in the left sidebar of the tool.
- Save any edits that are made to update the evaluation of the existing contributors' work and ensure any future attempts to answer the test question will be properly evaluated.
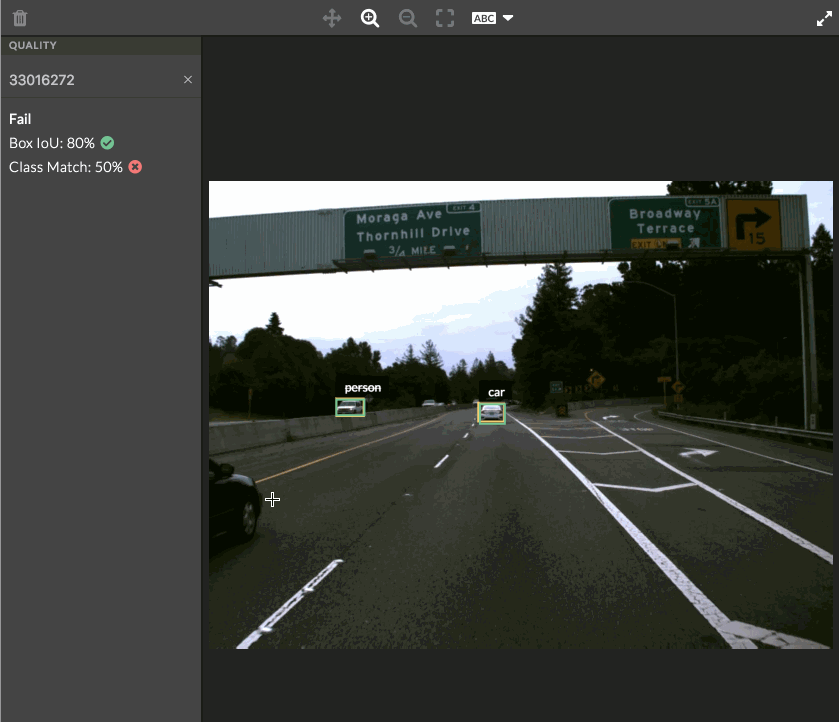
Fig. 5 Test Question Scores
Aggregation
Boxes
-
Aggregation for bounding boxes using cml:shapes works as follows:
-
Set the
box-aggparameter in the CML, which is the IoU (Intersection over Union) used for clustering boxes prior to aggregation.- IoU: Intersection over Union is the metric that evaluates the similarity between multiple bounding boxes.
- For example, if the
box-aggis 0.6, boxes that overlap each other by at least 60% will be clustered together.
- The corners of the constituent boxes are taken as dots and weighted according to the trust scores of the contributors who drew them.
- The 'dots' are then aggregated and a new box is drawn.
-
Set the
-
When using rotated bounding boxes:
-
The calculation of the IoU (Intersection over Union) takes into account the following parameters:
- Height: the height of the bounding box
- Width: the width of the bounding box
- Coordinates: the X and Y coordinates of the top left corner of the bounding box
- Rotation: the rotation angle of the bounding box. The rotation degrees are from the box center.
- The aggregation method is the average of all these parameters, while also taking into account the contributor's overall confidence score.
- Note: the
"allow-box-rotation"parameter needs to be set in order for this aggregation to occur. -
Example output when using rotated boxes:
-
Full Report:
[{"id":"a5528478-fe30-4f03-8e97-130bb29fda5c","class":"Boat","type":"box","angle":341,"coordinates":{"x":37,"y":147,"w":100,"h":27}},{"id":"c541f90d-e63e-4968-9e68-1b37936239c2","class":"Boat","type":"box","angle":316,"coordinates":{"x":313,"y":213,"w":62,"h":19}}] -
Aggregated Report:
[{“angle”:38.11111111111111,“average_trust”:0.6,“class”:{“eye”:1.0},“coordinates”:{“h”:80,“w”:68,“x”:781,“y”:219},“iou”:0.93,“type”:“box”}]
-
Full Report:
-
The calculation of the IoU (Intersection over Union) takes into account the following parameters:
- For a more in-depth guide for image annotation aggregation visit this link: Guide to: Image Annotation Aggregation
Labels (Classes)
The class-agg parameter accepts the following standard aggregation methods:
aggallagg_xcagg_x
Labels (or classes) are aggregated per returned box. This means, for example, if you choose to aggregate boxes - as opposed to selecting 'all' - and you choose class-agg="agg", for each aggregated box you'd receive the most confident label out of the constituent boxes in the cluster. If you choose class-agg="all", you'd receive every label applied to the cluster of boxes, but still just one box, and so on. For box-agg="all", you'd receive every box and every label in the image, no aggregation. Labels will always be grouped with the shape they were applied to and will be returned in a dictionary.
Example output of a job with box-agg="0.6" and class-agg="agg":
[{“average_trust”:0.7857,“class”:{“car”:1.0},“coordinates”:{“h”:330,“w”:384,“x”:1191,“y”:306},“iou”:0.9628,“type”:“box”}]
Example output of a job with box-agg="0.6" and class-agg="all":
[{“average_trust”:0.7857,“class”:{“car”:0.33,”person”:0.33,”tree”:0.33},“coordinates”:{“h”:330,“w”:384,“x”:1191,“y”:306},“iou”:0.9628,“type”:“box”}]
Reviewing results
To review the results of your job, you can either use our Quality Audit feature (recommended), or the following:
- Go to the Data page.
- Click on a unit ID.
- In the sidebar of the annotation tool, select an option from the drop-down menu.
- You’ll see different contributor IDs, which allow you to view individual annotations.
- You’ll also see an “aggregated” option, which shows you the result you’ll get based on your aggregation settings in the CML or report options page of your job.