Important note: This article contains information regarding our Dedicated product. If you are looking for documentation regarding the cloud data annotation platform, please visit all other categories in our larger Success Center.
Benefits of Single Sign-On
- Users have to memorize fewer passwords, thereby increasing usage and time savings.
- All established password policies for your corporate network are in effect increasing security for users who have access to sensitive data.
How to Access SSO Set-up Page
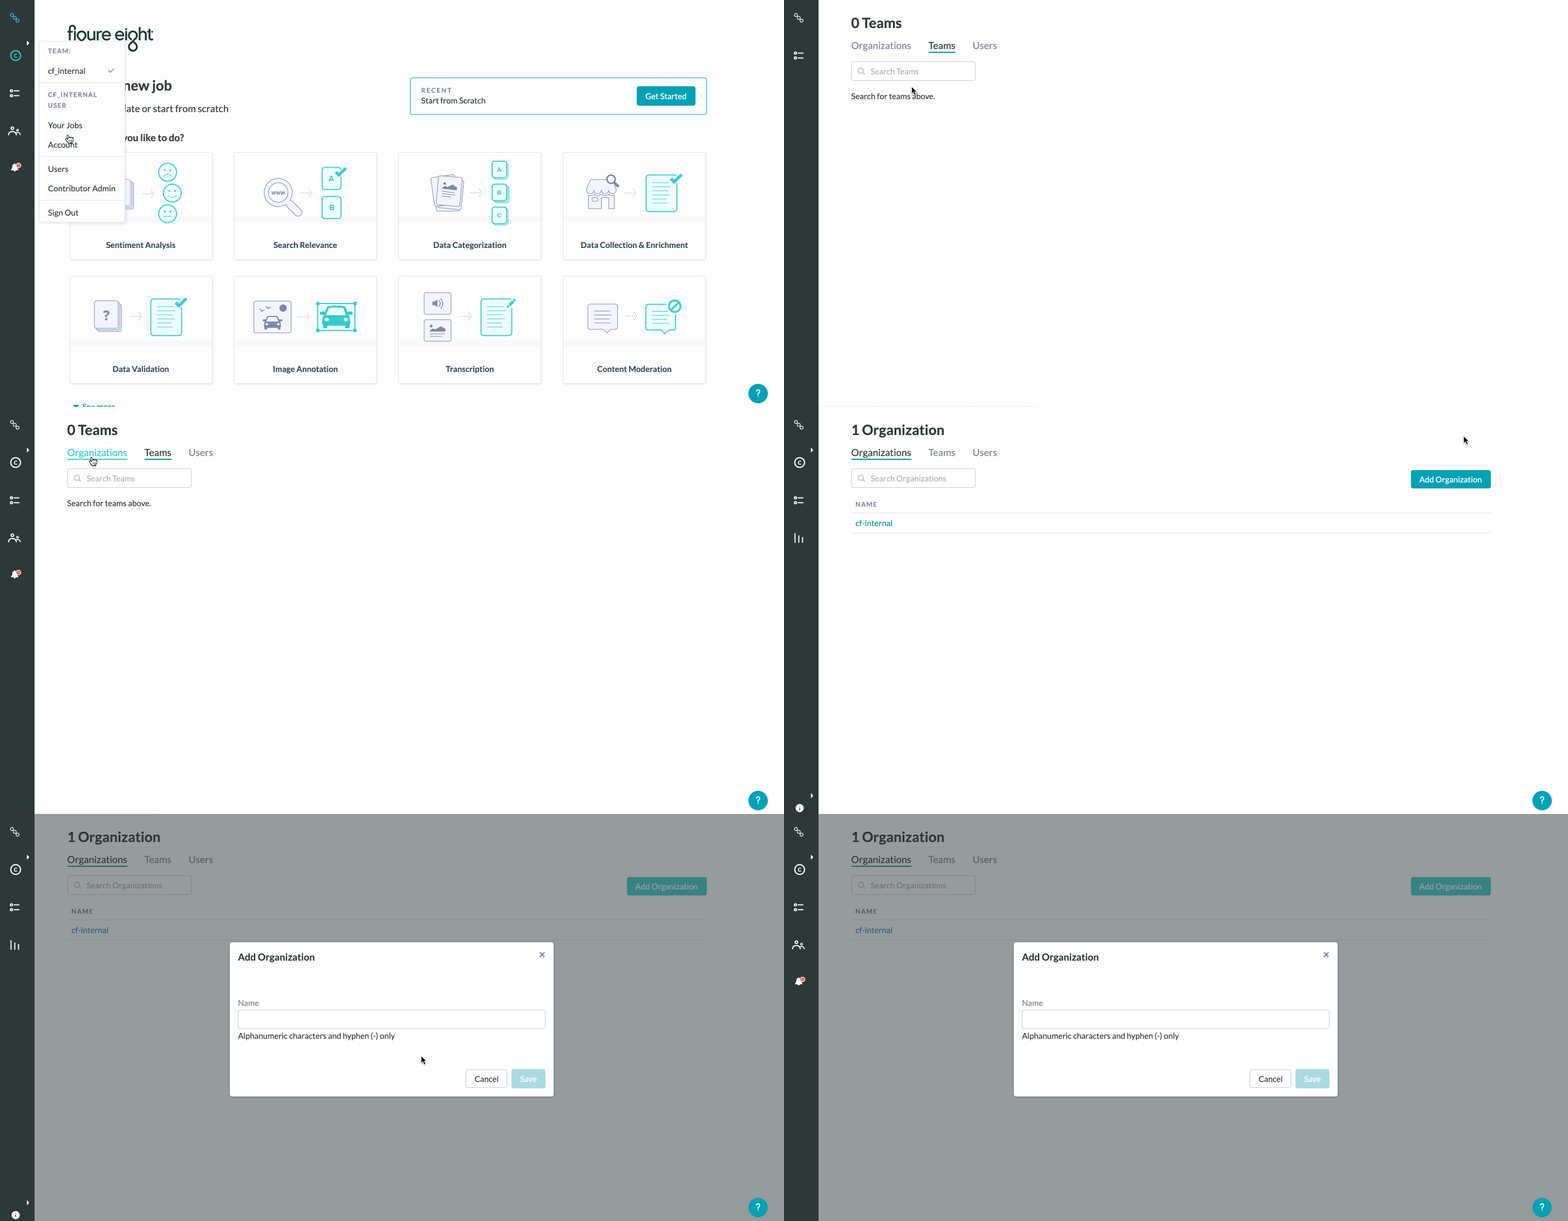
To begin the set-up process for this feature, an organization must be created. Once an org is created, the SSO feature is automatically available to be set-up. Only system-admins can create new organizations at this time by following the steps below:
- Click the account icon on the global navigation bar -> 'Users'.
- From there, you can click 'Organizations' tab and sequentially, the 'Add New Organization' button.
- Once the org is created, you can add all desired teams to the org for the Single Sign on integration.

Fig. 1: How System-Admins can create an Org
Guide to Set-up SSO Integration
Step 1: Provide SSO Configuration Details in Dedicated platform
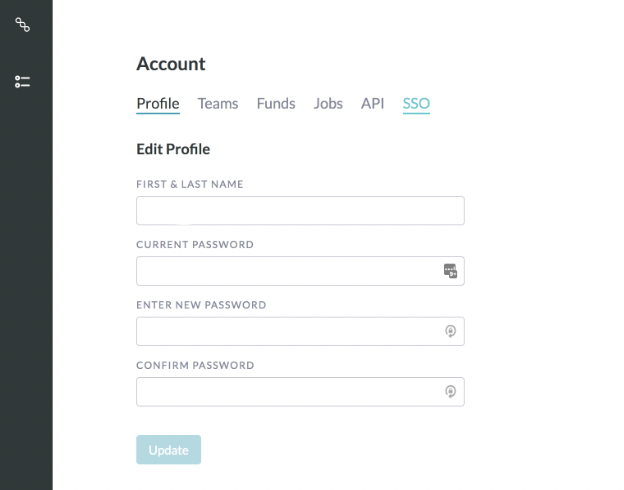
- Once the organization is set up by the system-admin, the system-admin or org admin should navigate to their Account Page -> SSO tab.
- Important Note: Only Organization Admin(s) have access to set up the integration. The SSO tab will not be visible to standard users.
-
-
 Figure 2: Dedicated Account Page
-
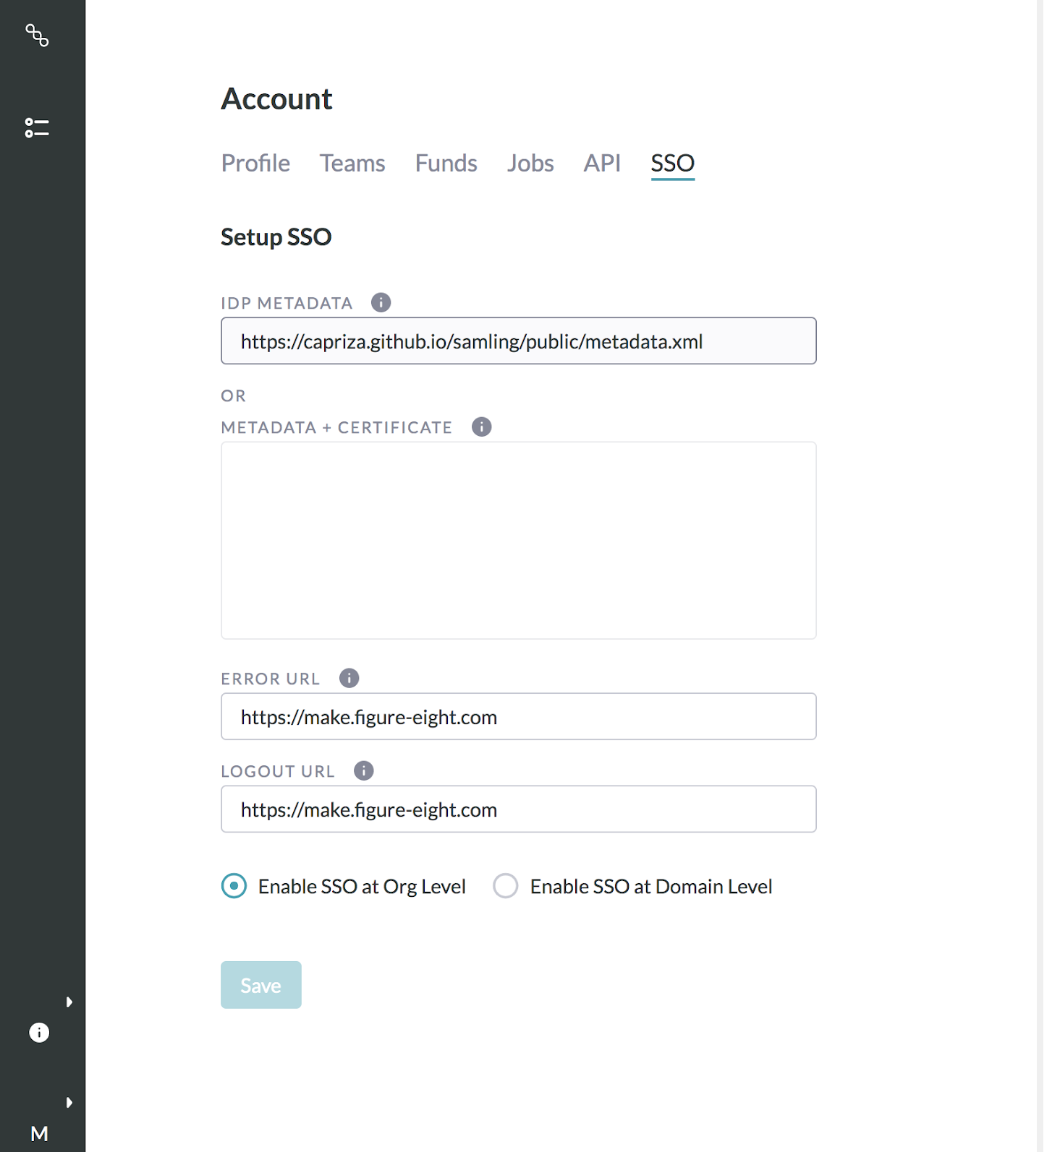
- Provide your IdP XML metadata. You have 2 options to enter the metadata
- Provide a URL with IdP metadata (ex: https://idp.ssocircle.com/) OR copy and paste the XML metadata in the textbox.
- See the example below. Note: Replace
${certificate}with client certificate -
<md:EntityDescriptor xmlns:md="urn:oasis:names:tc:SAML:2.0:metadata" entityID="http://www.okta.com/exk2en8uYL5E4ldZ4355">
 <md:IDPSSODescriptor WantAuthnRequestsSigned="false" protocolSupportEnumeration="urn:oasis:names:tc:SAML:2.0:protocol">
   <md:KeyDescriptor use="signing">
     <ds:KeyInfo xmlns"http://www.w3.org/2000/09/xmldsig#">
       <ds:X509Data>
         <ds:X509Certificate>${certificate}
         </ds:X509Certificate>
       </ds:X509Data>
     </ds:KeyInfo>
   </md:KeyDescriptor>
   <md:NameIDFormat>
     urn:oasis:names:tc:SAML:1.1:nameid-format:unspecified
   </md:NameIDFormat>
   <md:NameIDFormat>
     urn:oasis:names:tc:SAML:1.1:nameid-format:emailAddress
   </md:NameIDFormat>
   <md:SingleSignOnService Binding="urn:oasis:names:tc:SAML:2.0:bindings:HTTP-POST" Location="https://nearsoft.okta.com/app/nearsoft_f8test_1/exk2en8uYL5E4ldZ4355/sso/saml" />
   <md:SingleSignOnService Binding="urn:oasis:names:tc:SAML:2.0:bindings:HTTP-Redirect" Location="https://nearsoft.okta.com/app/nearsoft_f8test_1/exk2en8uYL5E4ldZ4355/sso/saml" />
 </md:IDPSSODescriptor>
</md:EntityDescriptor> -
 Figure 3: SSO Settings - Setup SSO
- Provide Redirect URLs (optional)
- If you'd like, you can configure the following URLs so that users are redirected back to their corporate network when required. If you do not want redirect URLs, please enter the default Dedicated URL (https://app.{{custom-domain}}.com/make).
- Important: HTTPs header is required
- Redirect Error URL: Provide a URL the user should be redirected to when an authentication/authorization error occurs.
- Redirect logout URL: Provide a URL the should be redirected to when the user is logged out of the platform.
- Select the "Org-level" option for integration.
- Org-level (recommending): Only users who are associated with teams within the organization will be able to use SSO. Other users from your company using their corporate emails to login to the Dedicated platform continue to use their own platform credentials, but they will not have access to the organization data or jobs.
- Example: If Dan@company.com is part of the Appen Org named "Company", he will use SSO to access the platform. However, if tom@company.com is not part of the Appen Org named "Company", he will not be able to use the SSO but can log in using Appen credentials.
- Org-level (recommending): Only users who are associated with teams within the organization will be able to use SSO. Other users from your company using their corporate emails to login to the Dedicated platform continue to use their own platform credentials, but they will not have access to the organization data or jobs.
- Go ahead and 'Save' the settings.
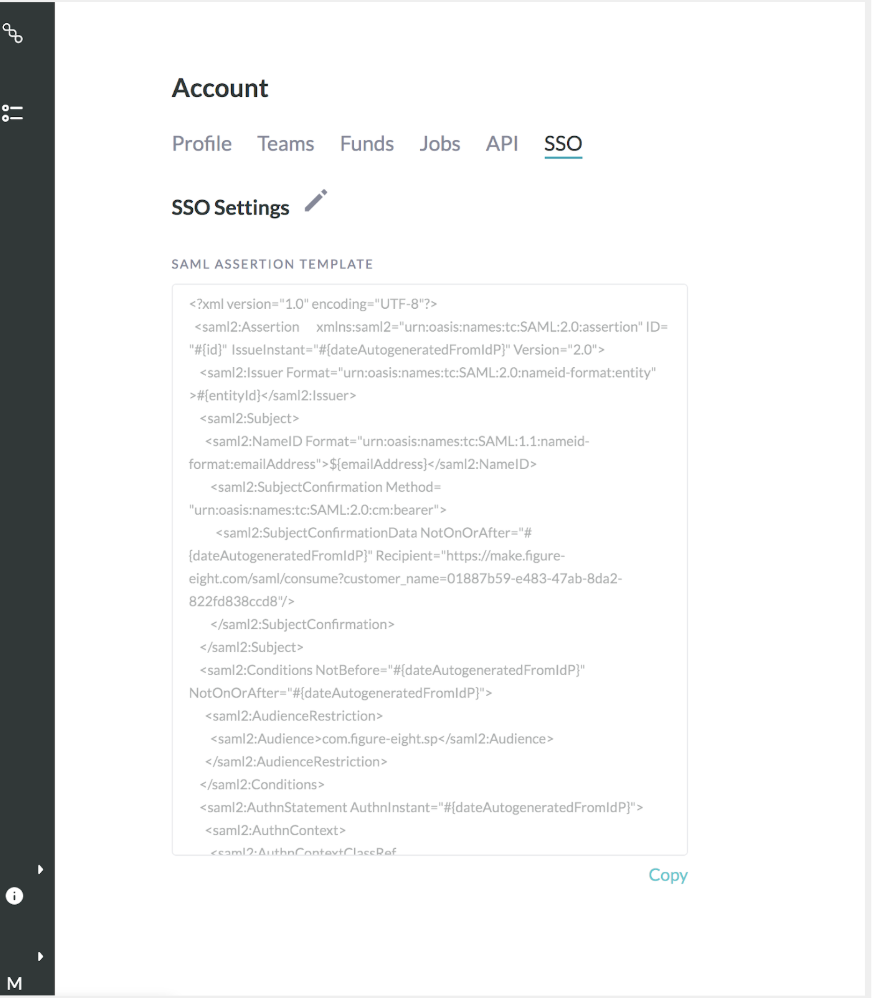
- After the set-up is completed successfully, you will receive a SAML assertion template to configure in your IdP.

Figure 4: SSO Settings - SAML Assertion Template
- Copy the SAML assertion.
- You can go back and edit your SSO set-up by clicking the edit button present in the "SSO Settings" tab.
Step 2: Set-up SAML Assertion Details in IdP
Appen requires the SAML assertion to follow this template provided to you after you complete SSO set-up.
- Variables starting with $ are user-specific
- Variables starting with # are Identity Provider (IdP) / customer-specific
<?xml version="1.0" encoding="UTF-8"?>
<saml2:Assertion xmlns:saml2="urn:oasis:names:tc:SAML:2.0:assertion" ID="#{id}" IssueInstant="#{dateAutogeneratedFromIdP}" Version="2.0">
<saml2:Issuer Format="urn:oasis:names:tc:SAML:2.0:nameid-format:entity">#{entityId}</saml2:Issuer>
<saml2:Subject>
<saml2:NameID Format="urn:oasis:names:tc:SAML:1.1:nameid-format:emailAddress">${emailAddress}</saml2:NameID>
<saml2:SubjectConfirmation Method="urn:oasis:names:tc:SAML:2.0:cm:bearer">
<saml2:SubjectConfirmationData NotOnOrAfter="#{dateAutogeneratedFromIdP}" Recipient="https://make.figure-eight.com/saml/consume?customer_name=customer_name"/>
</saml2:SubjectConfirmation>
</saml2:Subject>
<saml2:Conditions NotBefore="#{dateAutogeneratedFromIdP}" NotOnOrAfter="#{dateAutogeneratedFromIdP}">
<saml2:AudienceRestriction>
<saml2:Audience>com.figure-eight.sp</saml2:Audience>
</saml2:AudienceRestriction>
</saml2:Conditions>
<saml2:AuthnStatement AuthnInstant="#{dateAutogeneratedFromIdP}">
<saml2:AuthnContext>
<saml2:AuthnContextClassRef>urn:oasis:names:tc:SAML:2.0:ac:classes:PasswordProtectedTransport</saml2:AuthnContextClassRef>
</saml2:AuthnContext>
</saml2:AuthnStatement>
<saml2:AttributeStatement>
<saml2:Attribute Name="team_id" NameFormat="urn:oasis:names:tc:SAML:2.0:attrname-format:basic">
<saml2:AttributeValue
xmlns:xs="http://www.w3.org/2001/XMLSchema"
xmlns:xsi="http://www.w3.org/2001/XMLSchema-instance" xsi:type="xs:string">${teamId}
</saml2:AttributeValue>
</saml2:Attribute>
<saml2:Attribute Name="emailAddress" NameFormat="urn:oasis:names:tc:SAML:2.0:attrname-format:basic">
<saml2:AttributeValue
xmlns:xs="http://www.w3.org/2001/XMLSchema"
xmlns:xsi="http://www.w3.org/2001/XMLSchema-instance" xsi:type="xs:string">${emailAddress}
</saml2:AttributeValue>
</saml2:Attribute>
</saml2:AttributeStatement>
</saml2:Assertion>
Assertion Timeout:
- The platform enforces the "Conditions" field with "NotBefore" and "NotOnOrAfter" values in assertions. If the assertion comes to Appen before one hour the "NotBefore" timestamp value or one hour after the "NotOnOrAfter" timestamp value, the assertion will fail.
- The one-hour standard delta is to account for system time lag or other possible time differences. The customer will be responsible to post the assertion within the time values sent to Appen.
Note: For <Attribute Name="emailAddress" ... /> element, we will actually accept a Name value like Name="http://schemas.xmlsoap.org/ws/2005/05/identity/claims/emailaddress".
Once the necessary IdP configuration is done from your side, the users should be able to login to Appen via SSO.
Additional Instructions:
- Supported IdPs: Our SSO integration supports SAML and all SAML based SSO Identity Providers.
- SSO login is supported for the following scenarios:
- When the user logs in as a job requestor and is accessing any page on https://app.{{custom-domain}}.com/make.
- When the user has a job requestor account and is trying to access an internal work link to work as an internal contributor.
How to Add Requesters to SSO-Enabled Organizations
SSO must be configured on an organization before inviting new requesters. If SSO is enabled on an organization with pre-existing requesters, those requesters will be forced to log-in via SSO after the feature is enabled.
How to invite new requesters to SSO-enabled organizations:
- Organization-Level
- The System-Admin or a Team Admin will need to invite the requester email to the desired team within an SSO-enabled organization
- This can be done via the Account > Team page for Team Admins or via the Users > Teams page for Platform Admins
- Once the invitation is sent, the requester should “Sign Up” with the invited email
- After signing-up, the requester will be added to the designated team and organization
- All subsequent logins for the requester can now be authenticated via SSO
Note: Once a new user is invited to an SSO-enabled organization, there is no need to enter anything in the password field of the Dedicated login page. The invite user's email will be automatically detected and then redirected to the IDP. Alternatively, there is no need to start a new platform session on the Dedicated login page and the session can start directly from the IdP site.