Important note: This article contains information regarding our Dedicated product. If you are looking for documentation regarding the cloud data annotation platform, please visit all other categories in our larger Success Center.
Overview
The Dedicated Cross-Team Access feature allows users to belong to multiple teams within an organization using just one login. This article outlines how to get started and what actions are available to whom.
The Benefit
Many users work among different types of teams within their organization. Sometimes these teams are based around objectives, sometimes they’re different departments. With Cross-Team Access, requesters can easily switch context to another team within the platform without having to create multiple accounts. This also allows clients with SSO to manage multiple teams’ hosted channel needs.
What's Available to Users
Different types of users within a team or organization will have different permissions. Outlined below are the different roles and what they can do. Users that are not org admins but belong to multiple teams may have different roles (standard/team admin) in each of the teams they belong to. In these cases, permissions will be dependent upon which team they are currently acting in (and the role they have in that team).
Standard User
Standard users have the fewest permissions associated with their role. These users can do standard actions such as:
- Create and launch jobs
- View team members’ jobs
Team Admin
Team admins can do everything a standard user can do, plus the following:
- Invite members to the team
- View the standard job cost report
Org Admin
Org admins have the highest level of access within the organization. Their role provides the following:
- Team admin-level access to every team in the organization
- The ability to consolidate team member accounts
Please see this Success Center article for more information on various Dedicated user roles and team/organization details.
How to Enable
This feature is automatically enabled once an organization is created. Only system-admins can create new organizations at this time by following the steps below:
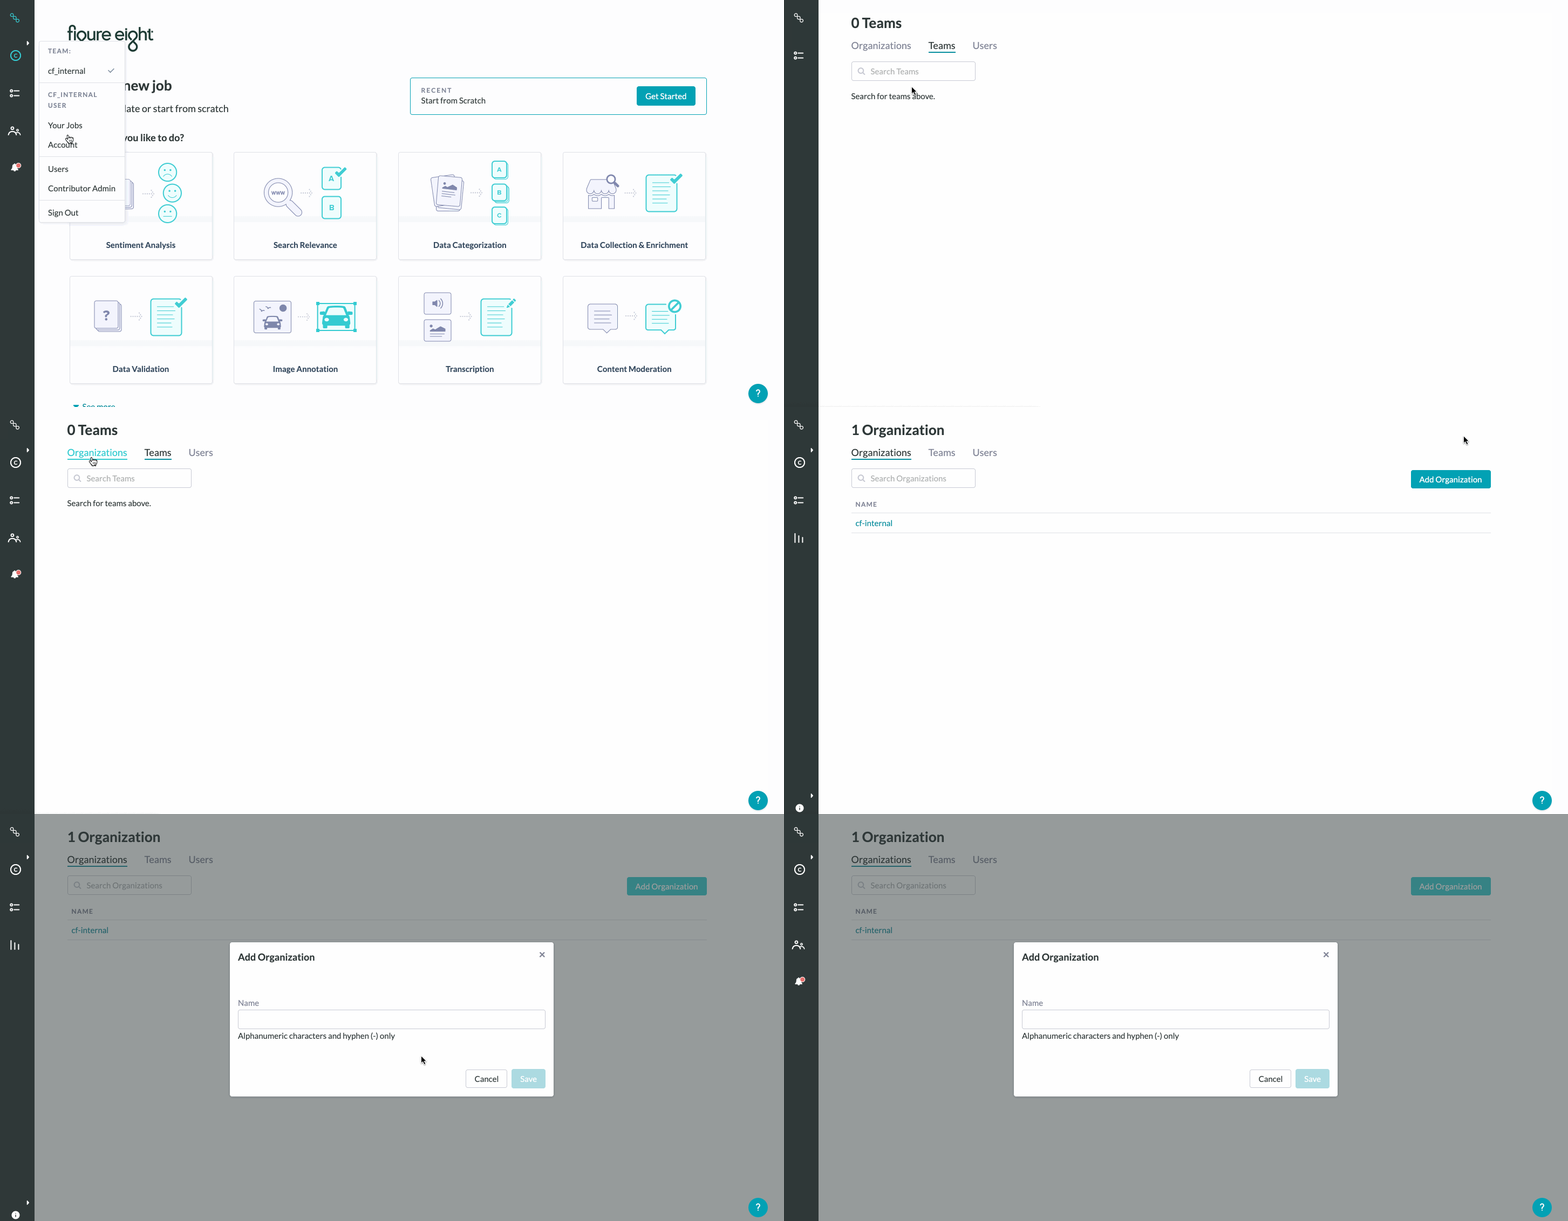
- Click the account icon on the global navigation bar -> 'Users'.
- From there, you can click 'Organizations' tab and sequentially, the 'Add New Organization' button.
- Once the org is created, you can add all desired teams to the org for Cross Team Access.

Fig 1: How System Admins can create a new Organization
Accessing Multiple Teams
Switching your platform team
In order to change your current team, select from the teams you belong to from an icon in the global navigation.

Fig. 2: Switching teams in Global Navigation
Your current team can be changed while on most pages in the platform with the exception of pages within jobs (e.g., Data, Design, Settings, etc). When inside a job, the option to change your current team is disabled.
Once a team is selected, all actions taken in the platform will be within the context of that team.
Joining Multiple Teams
Org or team admins can add existing users from their org to other teams as long as those users are within the same organization.
How it works:
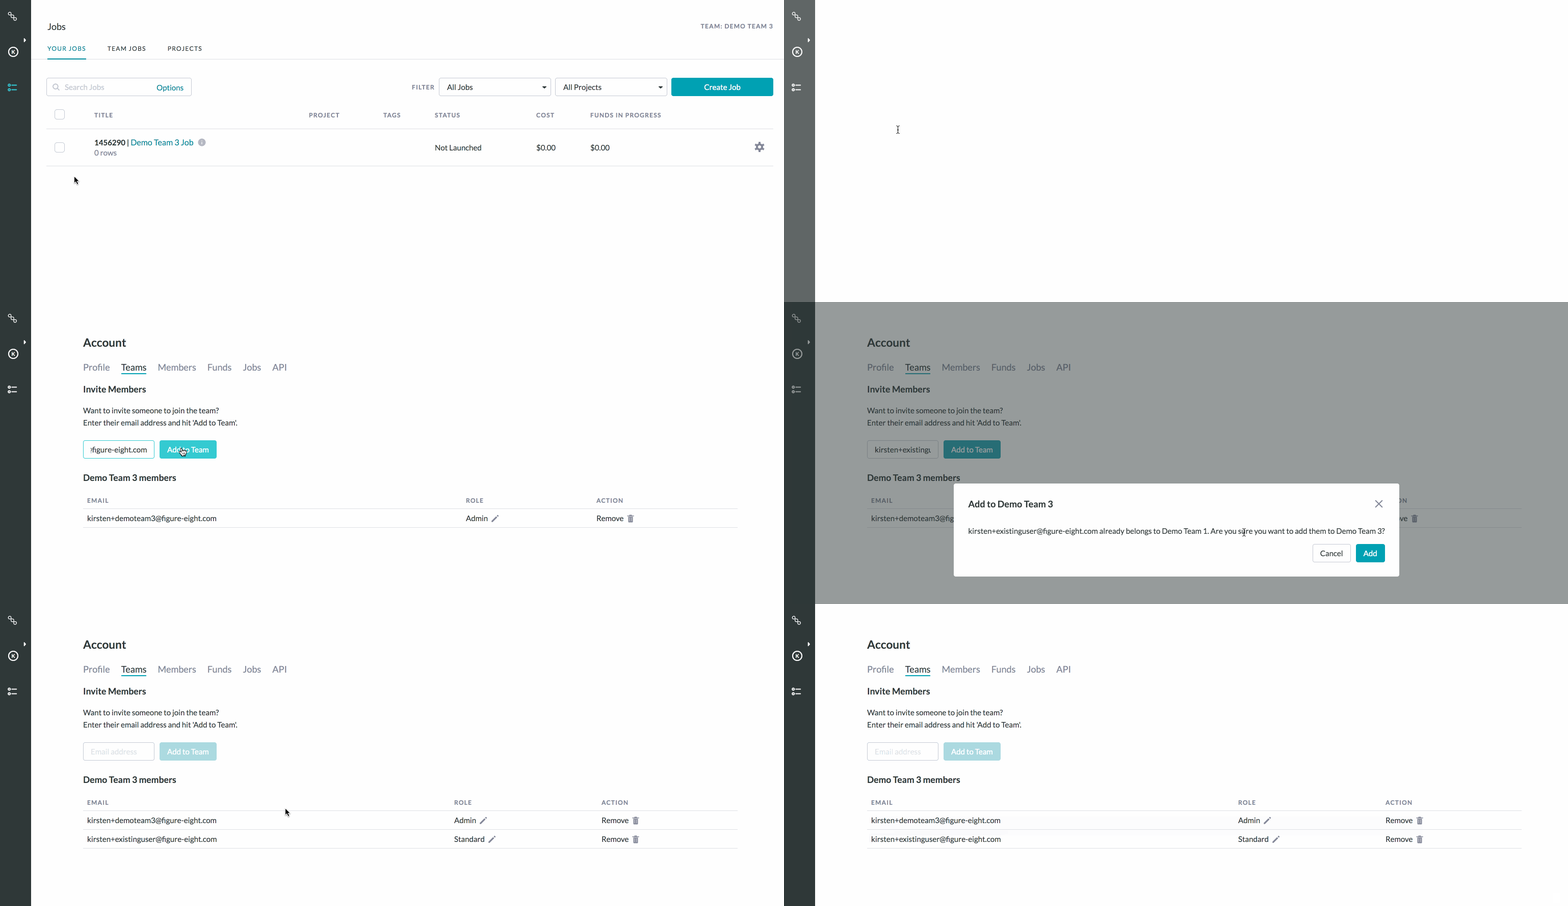
- If you are an org or team admin, select the team you would like to add users to by choosing the team from the global navigation.
- Navigate to the Team page within the Account view.
- From there, invite new users to the team or add existing users from within the organization to this team.
Note: Users belonging to different organizations cannot be added.

Fig. 3: How org/team admins can invite new users to a specific team
Copying a Job to Another Team
Users can copy a job from one team to another team they belong to via the API or the UI.
Copy via the API
To copy a job to another team using the API, please see the “API updates” section below.
Copy via the UI
There are two places to copy a job to another team via the UI: from the jobs page and from within an individual job itself. The process for each is the same:
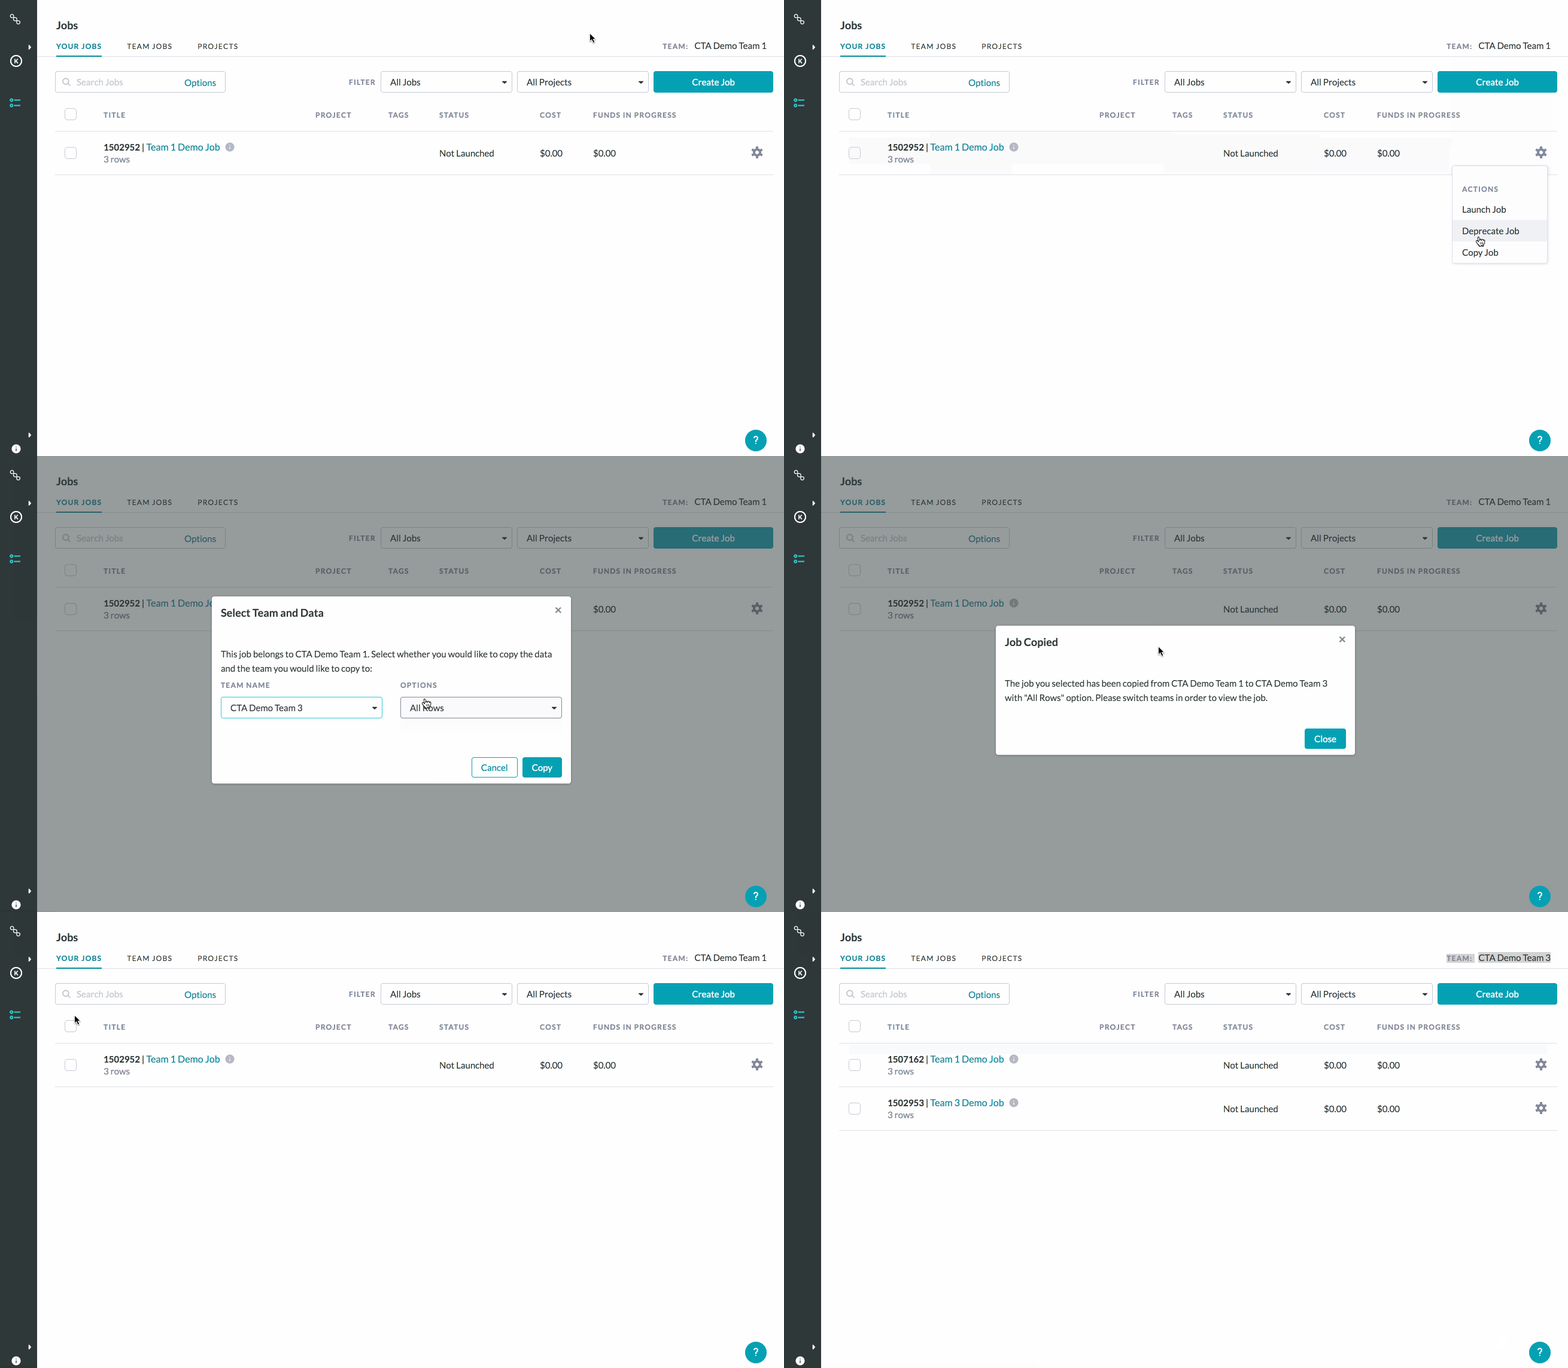
- On the jobs page, click the gear icon to the right of the job. From within a job, click the copy icon in the top right.
- Click ‘Copy Job'.
- A modal will open; select which team to copy into, whether it’s the current team the job belongs to or a different team you belong to.
- Select whether to copy with or without data.
- Click ‘Copy’.
- If the job was copied into the current team, the page will redirect to the Data Page of the new job copy.
- If the job was copied into a different team, you will need to switch your current team in the global navigation to view the job.

Fig. 4: Copying a job to another team via the UI
Consolidating Accounts
An Org admin will be able to assist if a user has multiple accounts that should be consolidated. In order to do so, the org admin can follow the steps outlined below.
Note: You can view who your Org admins are by going to Account page > Team in the global navigation. This page will display the Role type for each user.
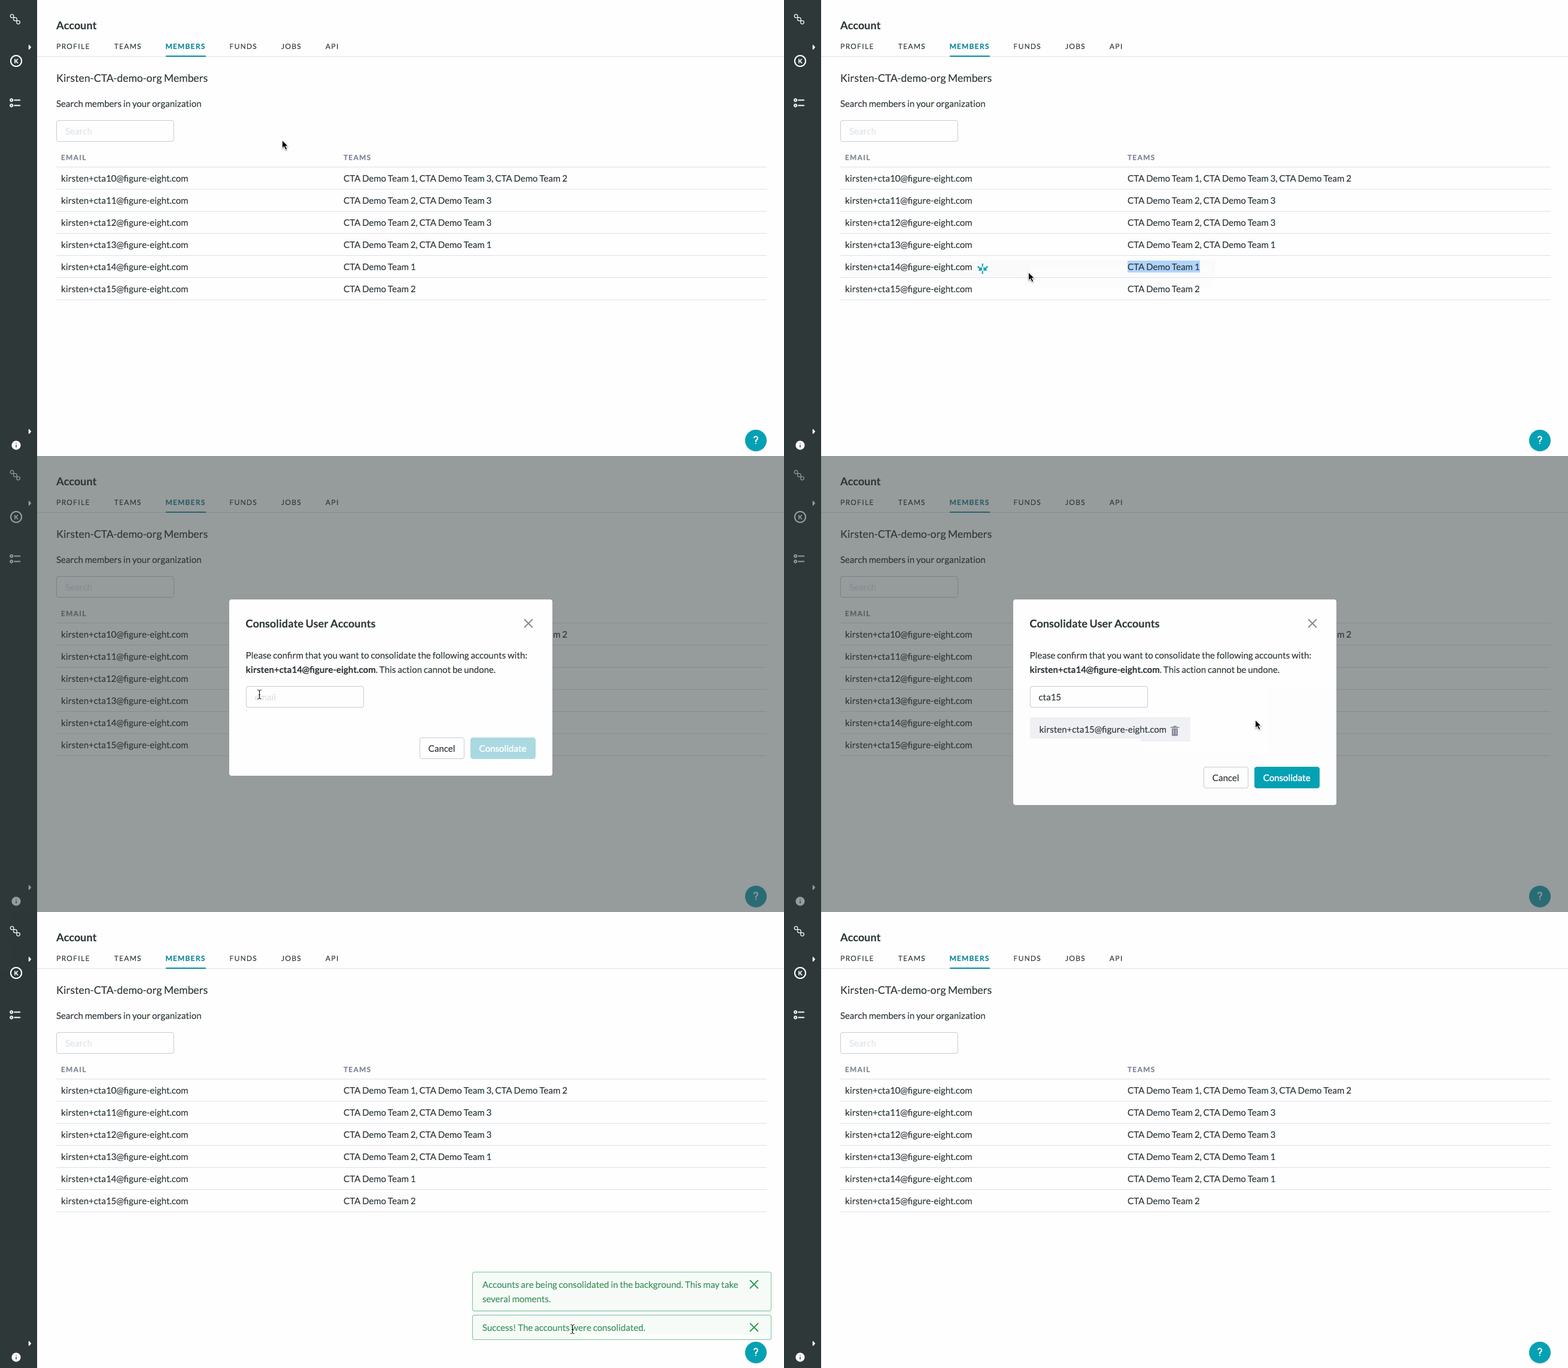
- Navigate to the ‘Members’ page within the Account view (the current team selected does not matter).
- Find the account that you want to be your main account (this will be the only account after consolidation), i.e., the account you will consolidate others into.
- They can use the search bar or paginate through the list.
- Hover over the account row in the table and click the Consolidate icon.
- A modal will appear. Type the emails of the accounts into the search field and select accounts that you want to be consolidated with the main account.
- Multiple accounts can be selected at a time.
- Confirm the consolidation. Account consolidation cannot be undone.

Fig. 5: How org admins can consolidate user accounts
Once accounts are consolidated, the following will occur:
- The main account will inherit team membership from each account, along with the specified role (standard/team admin) each account had on their respective teams.
- The jobs from each account will remain associated with and accessible to the teams they originally belonged to, but be found within the context of the main account.
- The original accounts will still exist but will not have any jobs attached to them.
API Updates
We’ve updated some of our API endpoints to support Cross-Team Access. For a full guide to our platform API, please visit https://<FULLY QUALIFIED DOMAIN NAME>/api-documentation.
Setting your API team
To build out an integration with our API, you’ll need to set your API team. This ensures that all commands you run through the API will be run within the context of that team. This can be updated at any time by using the same endpoint. If you do not set your API team, API requests will default to your current team as selected in the UI.
First, you will need to retrieve the IDs of all teams you belong to, which can be done using the following command:
curl -s -X GET https:// <FULLY QUALIFIED DOMAIN NAME>/builder/v1/users/teams?key={api_key}
You’ll receive an array of team IDs and their names following the sample response below:
[

  {

    "id": "12345678-cccc-1234-dddd-123456789012",

    "name": "Team 1"

  },

  {

    "id": "98769568-dddd-4321-eeee-987654321098",

    "name": "Team 2"

  },

  {

    "id": "28594012-eeee-5678-ffff-657895431209",

    "name": "Team 3"

  }

]
Using the array that is returned, you can choose the team you wish to set as your API team by executing the following command:
curl -X POST https://<FULLY QUALIFIED DOMAIN NAME>/builder/v1/users/switch_api_team/{team_id}?key={api_key}
Where {team_id} corresponds to the team to be set as your API team.
Updated API Endpoints
Creating a job with an optional team ID
Even once an API team is set, jobs can still be created via the API for other teams you belong to; you will simply need to pass the team ID to which the job will belong:
Create a job without data:
curl -X POST --data-urlencode "job[team_id]={team_id}" https://<FULLY QUALIFIED DOMAIN NAME> /builder/v1/jobs.json?key={api_key}
Create a job with data:
curl -X POST -T "{file_name}.csv" -H "Content-Type: text/csv" "job[team_id]={team_id}" https:// <FULLY QUALIFIED DOMAIN NAME>/builder/v1/jobs/upload.json?key={api_key}
Where {team_id} is the team the job will be created in and {file_name} is the name of the file that will be uploaded to the job.
Copying a job to another team
To copy a job to another team via the API, you can execute one of the following commands:
Copy with no rows:
curl -X GET "https://<FULLY QUALIFIED DOMAIN NAME>/builder/v1/jobs/{job_id}/copy.json?key={api_key}&team_id={team_id}"
Copy with all rows:
curl -X GET "https://<FULLY QUALIFIED DOMAIN NAME>/builder/v1/jobs/{job_id}/copy.json?key={api_key}&all_units=true&team_id={team_id}"
Copy with test questions only:
curl -X GET "https://<FULLY QUALIFIED DOMAIN NAME>/builder/v1/jobs/{job_id}/copy.json?key={api_key}&gold=true&team_id={team_id}"
Where {team_id} is the destination team the job will be copied into.